Also on the preview this morning is the British Great War boxed set. Called Mitchell's Marauders (GBRAB1), the box includes enough to get you started with your World War I British Army. Similar to the German boxed set, you bet a command group, two infantry platoons, a machine gun platoon, an artillery detachment, and armored support. In this case, the armored support consists of two Mark IV tanks and one Whippet. Previous reviews have shown that the Mark IV tanks include magnets in the sponsons allowing you to change from the "male" to "female" variants from game to game. Personally, I think that's brilliant!
I've never done a British Army for Flames of War - for any period. The closest I've come is some tentative work on a 506 PIR in Market Garden with some British support, but that army is languishing in the queue behind many other projects. This is different - I've always loved the very early tanks pioneered by the British, and this neat little set is likely enough to get me to take the plunge. I'm going to have to win the lottery to have the TIME to paint all of the items in my queue!!!
Wednesday, July 30, 2014
Tuesday, July 29, 2014
Flames of War - BARBAROSSA!!!
If there is one supplement Flames of War players have been clamoring for, it's one covering Operation Barbarossa - Germany's invasion of the Soviet Union in 1941. The Early War period for Flames of War is a relative newcomer to the game, and Battlefront has taken a fairly "slow and steady" approach to the era. While the inclusion of the Japanese in the EW period was a nice surprise from Battlefront, many would have preferred to see Barbarossa.

Discussions on the Battlefront forum indicated that the release of Barbarossa would happen this year, and today a digital version of the sales flier for Barbarossa has cropped up on the internet.
With an October release date, we only have a few months to wait before the primary releases for Early War will finally be complete allowing coverage of the entire 1939-1941 period in Flames of War. The Soviet T-34 tank is highlighted in the flier, and it should be a real beast on an early war table. If the KV is included as well, that would be an even tougher nut to crack!
I'm really looking forward to the release of Barbarossa - the 1941 Soviet army has always held a lot of interest for me as you had the very forward looking T-34 and KV tanks serving alongside the T-35, T-28, T-26 and a host of other interesting designs. Hopefully I'll be through most of my painting queue before then!
Sunday, July 27, 2014
Flames of War - Tanksgiving List Ideas
The problem I've run in to working with Battlefront is that they're at the point in the war for the Germans that I've wanted to build lists for since I got into the game. The VERY late war stuff. Factory fresh panzers with elaborate paint jobs running alongside horse drawn wagons and trucks converted to run on burning wood! My next big late war tournament isn't until November, and it's a 1650 point "Tanksgiving" event. At this point I have three lists under consideration. All of the lists meet my criteria for "cool" (in other words, they're historically accurate and have something "cool" about the unit - be that history, paint jobs, performance in combat, or all of the above). So here are my thoughts...
First, 1/512 Schwere Panzerjägerkompanie - Ruhr Pocket - April, 1945 - this is a CV Kampfgruppe Ernst list
HQ - 1X Jagdtiger (395)
Platoon 1: 1X Jagdtiger (395)
Platoon 2: 4X Panzer IV J (350)
Weapons 1: 3X Ostwind (350)
Support 1: Volkssturm Platoon - Command Pzfst Rifle + 8X Pzfst Rifle (105)
Support 2: Volkssturm Platoon - Command Pzfst Rifle + 6X Pzfst Rifle (85)
Support 3: Volks Rocket Launcher Battery - Command SMG team, 2X Observer, 6X 15cm NW41 (135)
This list doesn't have a lot of hulls, but it is one of my favorite units. The Volkssturm units are good in making sure that you get a lot on the table in a reserve mission, and there's enough smoke to go around.
Next up is a Panzer Company from Desperate Measures. The force is based on Panzer-Abteilung 5 while attached to 25. Panzer-Grenadier Regiment. So here's what I have at this point.
I'm running them as a Veteran Division because, well, they were...
HQ - 1X Panther G (190)
Troop 1 - 2X Panther G (375)
Troop 2 - 4X Hetzer (340)
Weapons 1 - Panzer AA - 3X Möbelwagen (165)
Support 1 - Recon - 3X Aufklärer 38(t) (110)
Support 2 - Infantry - Panzersturm Platoon with 6X panzerfaust AR teams (320)
Support 3 - Artillery - 4X 15cm NW41 Launchers, observers, command, halftracks (150)
Total: 1650 on the nose
Again, not a lot of hulls here for a large list, and they're somewhat fragile. Panthers have been a tough sell in the benefit/points ratio since the Allied high-AT assets started showing up.
Finally - here are a couple of options for 510 Schwere Panzer Abteilung. This unit had some spectacularly painted King Tigers - a real mix of styles that lets me field just a little bit of everything, including a couple of nearly overall Primer Red ones! I've included a couple of options.
Here's what I'm working with at this point:
HQ - 1X King Tiger (215)
Platoon 1: 2X King Tiger (430)
Platoon 2: 2X King Tiger (430)
Support 1: Ersatz SS-Aufklärungs Platoon - command Pzfst SMG + 6X Pzfst Rifle/MG (200)
Support 2: Ersatz SS-Panzer Platoon - Panzer IV (Schurtzen) - 2X Panzer III M (Schurtzen) - 1X Panzer III - (230)
Support 3: Light AA Battery - Command SMG team - 4X 2cm Flakvierling 38 (75)
Support 4: Volks Rocket Launcher Battery - Command SMG team, Observer, 3X 15cm NW41 (70)
Total: 1650 on the nose
Upside - a lot of hulls with lots of armor and high AT - and some support tanks to keep everyone honest. Strong AA defense. Smoke. One good infantry platoon to hold key objectives.
Downside: Whole list is trained, most of it is reluctant, half of it is Allied
Intangible: List is an absolutely prototypical end of the war/last stand sort of list - and is pretty much dead accurate to what was in the field...
Option 2:
HQ - 1X King Tiger (215)
Platoon 1: 2X King Tiger (430)
Platoon 2: 2X King Tiger (430)
Platoon 3: Schwere Panzer Crew Platoon - Command Pzfst Rifle + 6X Pzfst Rifle (110)
Support 1: Volkssturm Platoon - Command Pzfst Rifle + 8X Pzfst Rifle (105)
Support 2: Ersatz SS-Panzer Platoon - Panzer IV + 3X Panzer III M (215)
Support 3: Light AA Battery - Command SMG team - 4X 2cm Flakvierling 38 (75)
Support 4: Volks Rocket Launcher Battery - Command SMG team, Observer, 3X 15cm NW41 (70)
Total: 1650 on the nose... again...
Upside - a lot of hulls with lots of armor and high AT - and some support tanks to keep everyone honest. Strong AA defense. Smoke. Two infantry platoons to hold the objectives - and the Volkssturm are always going to be there regardless of mission - which helps in reserve scenarios.
Downside: Still a lot of Allied platoons, but this adds one more organic platoon. Still a lot of trained, and the infantry units will be easier to break individually than the Ersatz SS unit because of their lower motivation and lack of "enjoy the war" rule.
Intangible: List is still absolutely prototypical end of the war/last stand sort of list - and is pretty much dead accurate to what was in the field.
From a "tourney standpoint" I think the 510 list is probably the strongest. You get five King Tigers, and that's only a little over half of your points!!!! All of them will look fairly awesome on the table, though. Post thoughts in the comments!
Friday, July 25, 2014
Great War Arrives!
My issue of Wargames Illustrated 322 finally arrived today with the inclusion of the Great War supplement for Flames of War, though oddly the preview isn't yet up on the Battlefront Website or the Wargames Illustrated website. Overall the armies look like they'll be fun, and I'm very excited about the upcoming terrain. I was a contributing author for this one, so I've been chomping at the bit for months for this to come out. The magazine itself also has several gems including several articles covering the Great War.
Page 4 has details of the upcoming releases - which as mentioned in previous blog entries are drool worthy. These include a German battle box, a British battle box, as well as supporting blisters for additional units. World War I terrain is also included.
Page 10 features an article by Phil Yates entitled "Mythbusting the Great War" which goes through many of the common misconceptions about World War I and provides a healthy dose of reality. Many of the objections I've seen raised about attempting to war-game World War I relate directly to current perception of how that conflict was conducted, and many of those perceptions are at least partly erroneous.
Mike Haught continues in the same theme with an article on page 24 entitled "Wargaming Myths of the Great War." This article discusses how Battlefront worked to maintain accuracy and balance in the Great War supplement, and why the release may not be what many people expect.
On page 44 is an article by your's truly entitled "Iron Fortresses - British and German Tanks of WWI" which details the technical and operational history of the vehicles you can field in the Great War supplement - namely the Mark IV, the Whippet, and the A7V. Less well-studied than their more glamorous World War II counterparts, there are numerous misconceptions about these beasts and how they were actually employed in World War I.
Mike Haught picks up the torch again on page 58 with the article "Over the Top - Using Normal Flames of War Missions in the Great War". One of the key innovations of the Great War supplement is a series of semi-linked missions which are suitable for the forces provided in the supplement, but who really wants to stop there!?! This article provides updates to some standard missions to give the player more range and options.
As always the presentation of the magazine and Great War rule set is slick and extremely professional! I've just received my Ammo of MIG paints for World War I tanks in the mail - now I can't wait for the miniatures to be released! Finally to celebrate the release of the newest period for Flames of War, I'll leave you with this funny dedicated to all of the guys who lived through the 80's!
New AMMO Wargamer Colors
I love Mig Jimenez - I really do... and I only say that through slightly clinched teeth at this point. No sooner do I get the basecoats done on my 1945 Jagdtigers and Ostwinds than the AMMO line releases four paint sets specifically designed for the wargamer. These sets allow for a modulated base coat with an overspray of the disruptive camouflage colors.
The Wargame 1945 Late German Set (A.MIG-7118) includes colors for a base green with the characteristic late red-brown and light dunkelgelb colors. Front and center on the examples is a Jagdtiger that looks conspicuously similar to a Battlefront one... painted in a scheme very similar to what I was going for (though I wasn't going to use the ambush dots as the photos I have don't seem to show them). Now I'm in a quandry - to repaint, or not to repaint...
The new releases also include three other sets, an Early and DAK Set (A.MIG-7116), a German 1943-45 Set (A.MIG-7117), and a U.S. Armor Set (A.MIG-7119). Needless to say, I've ordered several at this point. Now do I take the plunge and get that high-end airbrush I've been drooling over. My poor bank account!
Thursday, July 24, 2014
1/512 Panzerkampfwagen IV Ausf J Progress
Roughly in parallel with the work on the Jagdtigers and
Ostwind from 1/512 Schwere Panzerjäger Abteilung I have been working on the
unit’s Panzerkampfwagen IV Ausf J. These
are the ones you’ve seen in previous blog entries where I have gone through and
updated both the hull and the running gear of the Ausf. J to accurize it. Now that they are all together I’ve started
the painting process.
I’m also using a late war scheme from the AK Interactive
1945 German paint set, though this one is using the other three colors in the
pack of six – a different Dunkelgelb, a Rotbraun, and a different green. The Panzerkampfwagen IV were attached to the
unit from units in the area, so it would not have likely received the same
paint scheme as the core vehicles from 1/512.
The different paint schemes will also highlight the cobbled-together
feel of these late war units.
As before I started with a base coat of dunkelgelb and
then began masking. This time instead of
using silly putty, I used a white poster tacking compound – or “sticky tack.” In some ways it works much better than the
silly putty. You can get thinner lines
and the material holds its shape better.
However, it tends to adhere to the miniature. While I had no problems getting it to release
without stripping the paint, it was much stickier than the silly putty. I’ve heard of a product called “Panzer Putty”
that I’d like to try next, but I’m still searching for a U.S. source /
distributor. I’ve contacted the main
company in Germany, but haven’t heard back yet – wish me luck!

As before I went through and added the camouflage colors
in sequence starting with the dark green and finishing with the red brown. As before, the bulk of the putty becomes
quite thick, though with the poster tack you can get thinner masks if you so
desire. Another advantage of the poster
tack over the silly putty is it was possible to mask the barrel with the putty
rather than having to use blue tape.

Once the masks came off I was fairly pleased with the
result, but it is still hard to get a true “soft edge” scheme with either of
these techniques. Based on the Panzer
Putty guide, it looks like it holds its shape better, so I may be able to get a
soft edged scheme that way.

Next is marking and washes. I don’t have any data indicating what the
actual turret numbers were for the 1/512 Panzerkampfwagen IV were at this point
– so I’m likely going to go with 121 through 124 as the unit as a whole was
down to 3 or 4 Jagdtigers at that point in the war. I’m targeting having the army ready to go for
a Tanksgiving tournament in November, but I haven’t even started on the
infantry at this point (I’m planning at least one unit of Volkssturm).
Wednesday, July 23, 2014
Battlefront's World War I Germans
With the upcoming release of the Great War supplement for Flames of War, anticipation has been building around the miniature support for this new era. Some details have been sneaking out, but now one of the first full product spotlights is up on the Flames of War main page. Battlefront is offering army deals for the World War I forces, which seems like a smart way to go.
The first army deal covers the German forces - Blitz's Battlegroup (GGEAB1). The box includes a command group, two infantry platoons, a machine gun platoon, an infantry gun platoon, and two A7V tanks. Based on the photos alone, the box looks very promising - the figures look good, and the tanks look amazing. The boxed set should provide a very solid core for any German force from the upcoming Great War supplement.
I was initially a little skeptical of how Flames of War would translate to World War I, but given Battlefront has decided to start in the part of the Great War where combined arms began to come to the fore, the rules should translate well. I can't wait until the miniatures and rules hit the street... now I just need to find time in my painting queue...
Wednesday, July 16, 2014
1/512. Jagdtiger and Ostwind Painting Progress!
No really! Occasionally I actually manage to PAINT some miniatures. I've wanted to try out AK Interactive / Ammo of MIG paints on Flames of War miniatures for quite some time. One reason I hadn't was modulation of a multi-tone camouflage scheme is difficult at 15mm scale (I want to be the guy at Heresy Brush when I grow up!), and the simple fact that my Testors Model Master Paints work well for most mid through late war vehicles. However, 1945 provides the modeler with several new paint options as the Germans began changing the paint schemes in late 1944.


Bringing them inside I ran a test fit and the paint schemes came out pretty well. A little touch up was needed in a few spots to line up the turrets properly on the Ostwinds and a couple of small pin-point touch-ups were needed on the Jagdtigers.


Many of the artist renderings of the vehicles in the Ruhr pocket are done using the 1945 colors. For my vehicles I'm using the AK interactive 1945 German Late War Colors set (AK 554). Since the split between AK Interactive and Mig Jiminez, I've tended to buy the Ammo of MIG products. An analogous Ammo of MIG set would be his Late War German Colors Set (A.MIG 7101) - although this one replaces the Schokobraun with a Olivgrun variant.
My longer term goal is to be able to do panel shading on multi-tone paint schemes, and for that I need some sort of masking putty that will allow me to put down successive layers reliably and shade them individually. For my first attempt I'm simply using Silly Putty. Yes, Silly Putty. It is cheap, easy to use, and doesn't adhere to the paint surface.
Using the 1945 colors really shakes up your world a bit if you're an avid German modeler used to seeing the typical Panzer Dark Yellow base. The most commonly depicted 1945 "Dark Yellow" is really far more cream in color than it is the more familiar yellow drab. As you can see from the photos below, the 1945 base color, AK calls it Duncelgelb aus '44 DG III, is striking, and very different.
After the base coat and the putty job, I moved on to the green. Keeping with the very late war theme I used B Resedgrun for the green on both the Jagdtigers and the Ostwind.
The green went on very smoothly with no issues. I then added more putty to the models to protect the green as I painted the Schokobraun:
By this point, the miniatures are starting to look pretty much like blobs, but just enough exterior is exposed to get the paint down properly. The Schokobraun gave me a bit of trouble whereas the other two colors had gone down pretty much without issue. I'm not sure if I was getting some clogging in my airbrush because of the heat or if the pigment wasn't well dissolved in the paint.
I took off the putty and blue tape as soon as the dark brown was try enough to handle on the Jagdtigers, and overall the effect looked pretty good:
Bringing them inside I ran a test fit and the paint schemes came out pretty well. A little touch up was needed in a few spots to line up the turrets properly on the Ostwinds and a couple of small pin-point touch-ups were needed on the Jagdtigers.
So now the base coats are down, and one thing you'll notice is the colors are BRIGHT!!!! Part of the reason for this is that the colors are designed to have later washes and filters applied over them which will tone them down a bit and allow for decent blending and highlighting.
At this point the AK Interactive paints are getting high marks overall, though the Schokobraun was a bit problematic. The Silly Putty works okay, but it tends to "move" over time, and if you're trying to do panel shading you simply can't tolerate instability in the mask. I may give blu-tac a try - of course, any thoughts or tips would be greatly appreciated!
At this point these are ready for a gloss coat followed by decals and weathering. I'm going to try and make up some of my own markings as the Jagdtigers represent vehicles X1 and X8 of 1/512. If I get the markings to work, I'll have enough for all of 1/512 as well as vehicle "Y" of 3/512.
Sunday, July 13, 2014
Upcoming Great War Supplement Reviewed
Model Dads has once again gotten their hot little hands on the "next big thing" in Flames of War ahead of everyone else, namely the Great War supplement, and have done their usual stellar review of it. I did a little writing for this one, but it is unclear whether my article is going directly into WI or if it comprised part of the book, either way I'm really looking forward to this one.
Looking at the photos in the book, the miniature range and terrain that Battlefront has developed look absolutely spectacular. I can't wait to get my hands on the tanks, and the terrain will be useful for both World War I and World War II battles in Flames of War. As I mentioned in an earlier post, I've already got the paints on order.
Given the armor heavy force mix, the most obvious period to try and match would be the Second Battle of Villers-Bretonneux, which featured the first tank-versus-tank battle in history. However, I really prefer the multi-tone German camouflage schemes, so I will likely paint my A7V up to match an alternate front as the tanks at Villers-Bretonneux appear to have been overall green-grey.
I know that there are still several gaps in World War II that many people would like to see filled (Barbarossa, Berlin, and the Asia-Pacific Theater), but Battlefront seems to really be at a point where the range must expand to remain vital and healthy. The additions of Viet Nam, the Arab-Israeli conflict, and now World War I represent a lot of untapped potential as the rule set works well for any combined arms battles up to the point where smart weapons begin to dominate the battlefield.
Thursday, July 10, 2014
The Martians Have Landed!!!
Let you think that I'm all about the steam tanks, I've also been working on some of the Martians as well - much to the delight of my 6 year old son, though honestly I think he prefers the tanks at this point (good boy!!!). The All Quiet on the Martian Front tripod sprues are very good. While they share some of the same fit issues with the alignment pins and tabs, there are no sink holes so far in the pieces themselves. This is a critical metric for any plastic kit that is using larger pieces.
At this point I've received both the Scout Tripod sprues and the Assault Tripod sprues. At this point it appears that the two will share a leg sprue going forward, despite the prototypes in the rule book having different legs. The leg sprue is shown below. You get two fixed legs and one articulated leg. There is usually a little gap between the two halves of the upper leg (which surrounds the ball joint) - you'll need to fill it with putty. Mold lines and flash are light and easily removed by scraping with a hobby knife. The legs and tentacles fit into the circular leg unit - and here the fit is actually quite good. All of this is put onto a the base provided. The fixed leg tabs fit right into the base, and the remaining hole can be filled during the basing process.

The Assault Tripod sprue is roughly the same size as the leg sprue and it includes all of the weapon and arm load outs you need for the Assault Tripod. The upper body... or head... or whatever... comes in three parts. The top and bottom halves need a little work to fit together properly, but the front with the characteristic eye fits well once you have the top and bottom together. You also get a heat ray arm, two regular arms (one of which can hold a globe of green gas if you're so inclined), a black dust launcher, and the green gas rack. There are also a couple of weapon arms which are used to mount the black dust or green gas systems. There is a fair amount of flash on a few parts, and you'll need to be careful with the alignment on the black dust launcher. Make sure you use the spacer (it attaches directly to the leg unit top) as it gives the Assault Tripod its characteristic height.

The Scout Tripod sprue is much smaller as there are fewer options for the "little brother" of the Assault Tripod. As before, the body... or head... or whatever... comes in three parts. The top and bottom halves of the scout tripod seem to go together just a bit better than the Assault Tripod, though I had a little more trouble lining up the front. Clamps and liquid cement are your friends! You also get the heat ray arm, a targeter arm, and a regular arm (just in case you don't want/need to mount the targeter).

The hardest part of assembly so far has been cleaning up the metallic tentacles without breaking them. They both have a mold line running down both sides of their full length. As they are fragile thin plastic I can envision that this is where people are going to run into trouble not only in assembly, but in storage and transport as well. However as you can see below, the final product looks just amazing!

I need to do some final clean-up sanding on the tripod before painting. At this point, it isn't glued to the base. As the tripods are supposed to be not only metallic... but VERY metallic, I'm going with Alclad II metalizer for them. I've had mixed results with metalizers in the past, but this product has gotten good reviews. Hopefully it will work well for me - again, I'm hoping to get to it next week while I'm on vacation!
At this point I've received both the Scout Tripod sprues and the Assault Tripod sprues. At this point it appears that the two will share a leg sprue going forward, despite the prototypes in the rule book having different legs. The leg sprue is shown below. You get two fixed legs and one articulated leg. There is usually a little gap between the two halves of the upper leg (which surrounds the ball joint) - you'll need to fill it with putty. Mold lines and flash are light and easily removed by scraping with a hobby knife. The legs and tentacles fit into the circular leg unit - and here the fit is actually quite good. All of this is put onto a the base provided. The fixed leg tabs fit right into the base, and the remaining hole can be filled during the basing process.
The Assault Tripod sprue is roughly the same size as the leg sprue and it includes all of the weapon and arm load outs you need for the Assault Tripod. The upper body... or head... or whatever... comes in three parts. The top and bottom halves need a little work to fit together properly, but the front with the characteristic eye fits well once you have the top and bottom together. You also get a heat ray arm, two regular arms (one of which can hold a globe of green gas if you're so inclined), a black dust launcher, and the green gas rack. There are also a couple of weapon arms which are used to mount the black dust or green gas systems. There is a fair amount of flash on a few parts, and you'll need to be careful with the alignment on the black dust launcher. Make sure you use the spacer (it attaches directly to the leg unit top) as it gives the Assault Tripod its characteristic height.
The Scout Tripod sprue is much smaller as there are fewer options for the "little brother" of the Assault Tripod. As before, the body... or head... or whatever... comes in three parts. The top and bottom halves of the scout tripod seem to go together just a bit better than the Assault Tripod, though I had a little more trouble lining up the front. Clamps and liquid cement are your friends! You also get the heat ray arm, a targeter arm, and a regular arm (just in case you don't want/need to mount the targeter).
The hardest part of assembly so far has been cleaning up the metallic tentacles without breaking them. They both have a mold line running down both sides of their full length. As they are fragile thin plastic I can envision that this is where people are going to run into trouble not only in assembly, but in storage and transport as well. However as you can see below, the final product looks just amazing!
I need to do some final clean-up sanding on the tripod before painting. At this point, it isn't glued to the base. As the tripods are supposed to be not only metallic... but VERY metallic, I'm going with Alclad II metalizer for them. I've had mixed results with metalizers in the past, but this product has gotten good reviews. Hopefully it will work well for me - again, I'm hoping to get to it next week while I'm on vacation!
Martian Front - Mark III Tank Progress
As I mentioned in an earlier blog, the All Quiet on the Martian Front steam tank sprue is very modular allowing you to build one of a myriad of vehicles. Although only the Mark I, II, and III are detailed in the current rule book, if you go over to the Alien Dungeon website they have a tutorial with instructions on how to build several alternative variants of the tanks including HMG armed Mark III's and the Mark IIB. To my knowledge the rules for these variants have not yet been published, but I expect they'll show up soon.
I've now built several Mark II tanks and have moved on to a couple of Mark III tanks as well. While I sincerely applaud Alien Dungeon for going with plastic from the outset, there are several problems with the molds. One issue common to all of the steam tanks is misalignment at the rear of the vehicle. As you can see in the photo below, the smokebox doesn't line up well, nor does the inner track unit plate on the right side. These issues are easy enough to fix with a little judicious sanding.

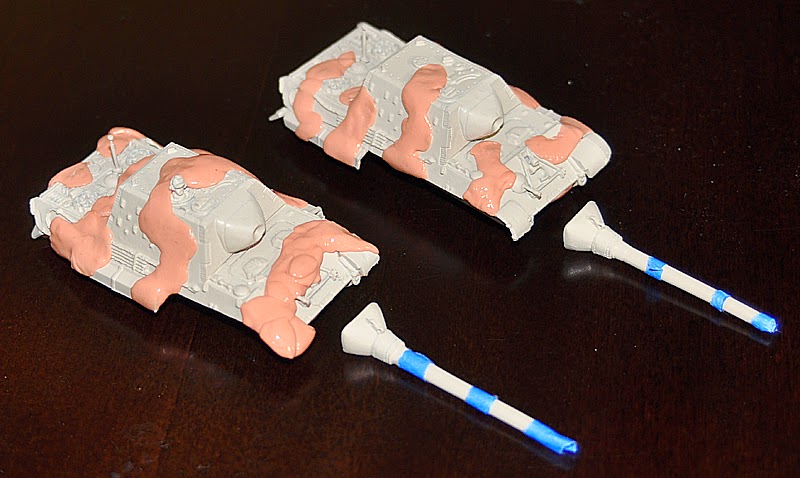
The sponsons on the Mark III (and other models) also suffer some severe gaps between the two sponson halves. As you can see from the photo below there are severe gaps to the top and bottom which require putty to fill. The front also requires putty, though I left the line on the back as it does give the appearance of armor plates meeting.


In general I've also found that the alignment aids on all of the kits have been too large (whether they be pins or tabs), and all have required some amount of sanding before the pieces could mate properly. While the end result still looks excellent, it does require extra time that could have been avoided if the tolerances were set more accurately.
While somewhat annoying to have to fix, the miniature actually does build up quite nicely. Below is the first Mark III I finished assembling. In the top and front views you can see the putty on the sponsons:

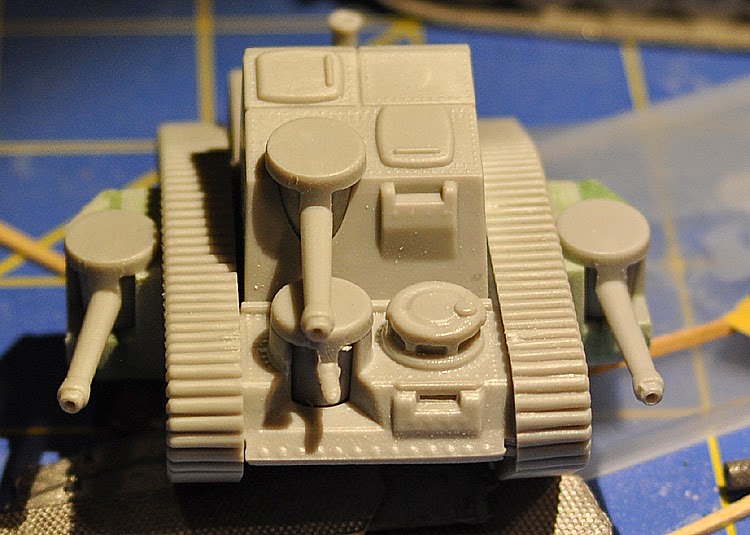
Because the guns are plastic, cleaning them up and hollowing out the tips is very easy providing a very nice looking final product. I'm planning on getting all 15 of my American Steam Tanks together before having a marathon painting session (hopefully when I'm on vacation next week).
I've now built several Mark II tanks and have moved on to a couple of Mark III tanks as well. While I sincerely applaud Alien Dungeon for going with plastic from the outset, there are several problems with the molds. One issue common to all of the steam tanks is misalignment at the rear of the vehicle. As you can see in the photo below, the smokebox doesn't line up well, nor does the inner track unit plate on the right side. These issues are easy enough to fix with a little judicious sanding.
In general I've also found that the alignment aids on all of the kits have been too large (whether they be pins or tabs), and all have required some amount of sanding before the pieces could mate properly. While the end result still looks excellent, it does require extra time that could have been avoided if the tolerances were set more accurately.
While somewhat annoying to have to fix, the miniature actually does build up quite nicely. Below is the first Mark III I finished assembling. In the top and front views you can see the putty on the sponsons:
Because the guns are plastic, cleaning them up and hollowing out the tips is very easy providing a very nice looking final product. I'm planning on getting all 15 of my American Steam Tanks together before having a marathon painting session (hopefully when I'm on vacation next week).
Flames of World War I - Paint for Tanks
Unless you've been under a rock, you've likely heard of the upcoming World War I range for Flames of War. It looks like Battlefront has put together a couple of decent army deals to help players get started. Battlefront's first foray into the war is actually fairly late in the conflict where the more familiar combined arms warfare was starting to take hold. I made a few writing contributions to this effort, and I'm honestly looking forward to it.
The tank was born during World War I, so literally everything about this cornerstone of modern ground combat was in its infancy, and that includes paint and camouflage. I'd been struggling to find good paints for my World War I armor as the Vallejo colors typically come out just a little off to my eye - at least on vehicles. On infantry they're the gold standard. I was therefore extremely excited when I went over to the Ammo of Mig site and saw their (new?) paint set for World War I British and German tanks.
Yes - I already have some on order... now I'm ready to get my grubby hands on the miniatures!
Saturday, July 5, 2014
All Quiet on the Martian Front - Steam Tank Mk II/III Sprue
After a communication and shipping snafu, the first batch of my All Quiet on the Martian Front miniatures from the highly successful Kickstarter Campaign finally arrived... just in time for me to have to go to Japan on business. Two weeks later I've finally been able to crack into the miniatures. I've started with the American Steam tanks. One of the stretch goals was reached so rather than these being delivered in resin and metal, they're injection molded plastic. Because they were able to go with an injection molded plastic frame, you can make several different steam tank variants from one sprue - though you'll still only get one tank per sprue.

The photo above shows the general layout of the steam tank sprue. I've gone through and labeled everything on it to the best of my knowledge/ability. For the common Mark II tank, you'll have quite a bit left over. The Mark III tank, with its higher superstructure uses more pieces. Because of the included interior detail, it's clear that the sprue will be used as a basis for several other vehicles as well.

The photo above shows the bottom of the steam tank sprue. The quality of the engineering and detailing is not quite up to what you'd expect from the larger miniature or model manufacturers. The rivet detail on the tank is fairly faint, and the overall fit is not spectacular. Just about every piece takes at least a little work to get it to line up properly. There is also a fair amount of mold offset on the short smokestacks. None of the issues with the mold are showstoppers, but be warned that you'll need to do a fair amount of fitting, sanding, and filing to get the tanks together.
The ejector pin marks on all of the bottom pieces are extremely deep. Fortunately they've done a good job of making sure you're unlikely to ever see any of them. A few of the round pieces may need a little extra work - as will the towing attachment, but otherwise all of the pin holes will be inside sealed portions of the model itself.
Another thing you'll notice about the steam tanks is that for 15mm miniatures they're BIG! This should be expected for vehicles inspired by World War I-era tanks. The picture below is a side view of a Battlefront Jagdtiger and a ready to paint Mark II Steam Tank - as you can see the lengths of the tanks are quite similar.

The relative level of detailing of the two should also be readily apparent - the detail on the Jagdtiger (even that which I didn't add myself) is very crisp and in high relief whereas the detailing on the steam tank is fainter. Truth be told, the rivet detail on the steam tank is probably more accurate to the scale, but it makes it more difficult to bring out the detailing with weathering. It also stands in stark contrast to some of the other detailing on the steam tank which is in strong relief.

The top view above further demonstrates the differences in the level of detailing. The tracks and hatches on the steam tank are strongly detailed, while the rivets and screens effectively disappear. I'm planning on doing a fair amount of panel shading on the steam tanks, so hopefully that will better bring out some of the detail.
At this point I have several sprues of tanks - somewhere around 15 if memory serves. I'm planning on doing at least six as the Mark III, with at least six Mark II - I may even try and bust out a few Mark I tanks if I can better confirm the parts count
The photo above shows the general layout of the steam tank sprue. I've gone through and labeled everything on it to the best of my knowledge/ability. For the common Mark II tank, you'll have quite a bit left over. The Mark III tank, with its higher superstructure uses more pieces. Because of the included interior detail, it's clear that the sprue will be used as a basis for several other vehicles as well.
The photo above shows the bottom of the steam tank sprue. The quality of the engineering and detailing is not quite up to what you'd expect from the larger miniature or model manufacturers. The rivet detail on the tank is fairly faint, and the overall fit is not spectacular. Just about every piece takes at least a little work to get it to line up properly. There is also a fair amount of mold offset on the short smokestacks. None of the issues with the mold are showstoppers, but be warned that you'll need to do a fair amount of fitting, sanding, and filing to get the tanks together.
The ejector pin marks on all of the bottom pieces are extremely deep. Fortunately they've done a good job of making sure you're unlikely to ever see any of them. A few of the round pieces may need a little extra work - as will the towing attachment, but otherwise all of the pin holes will be inside sealed portions of the model itself.
Another thing you'll notice about the steam tanks is that for 15mm miniatures they're BIG! This should be expected for vehicles inspired by World War I-era tanks. The picture below is a side view of a Battlefront Jagdtiger and a ready to paint Mark II Steam Tank - as you can see the lengths of the tanks are quite similar.
The relative level of detailing of the two should also be readily apparent - the detail on the Jagdtiger (even that which I didn't add myself) is very crisp and in high relief whereas the detailing on the steam tank is fainter. Truth be told, the rivet detail on the steam tank is probably more accurate to the scale, but it makes it more difficult to bring out the detailing with weathering. It also stands in stark contrast to some of the other detailing on the steam tank which is in strong relief.
The top view above further demonstrates the differences in the level of detailing. The tracks and hatches on the steam tank are strongly detailed, while the rivets and screens effectively disappear. I'm planning on doing a fair amount of panel shading on the steam tanks, so hopefully that will better bring out some of the detail.
At this point I have several sprues of tanks - somewhere around 15 if memory serves. I'm planning on doing at least six as the Mark III, with at least six Mark II - I may even try and bust out a few Mark I tanks if I can better confirm the parts count
Subscribe to:
Posts (Atom)