Miniature Ordnance Review looks at the world of historical and fantasy miniatures wargaming and model building. From 15mm Flames of War, to Warhammer 40K, to 1/35th scale tanks, with some potential surprises on the horizon - you'll find them here!

Sunday, September 3, 2017

An All too Hasty Attack at Amsterdam - A Team Yankee Firestorm After Action Report

So yet another batrep from the ongoing campaign - this one, well, let's just say it wasn't my finest hour and leave it at that!

Preamble

Guardian Games was hosting a Fighting First launch party today, and had three tables set up for people to come out and try the new American lists. Afterward, we'd set up for another Team Yankee game since I didn't get to try the Amsterdam mission on Thursday. Unfortunately we didn't get a chance to reset the tables with European terrain, so imagine if you will the Netherlands via Algeria... it could of course be the legal recreational pharmaceuticals merely making it LOOK like the desert.

I'd promised Ryan a return match since the last game went so poorly, and while this one wasn't a mirror image of the other game, it came close in a lot of ways. I ended up being far too aggressive with my armor - forgot the range on my Shilkas - and in short made a lot of rookie mistakes. Ryan, being a capable student of military history drew upon his Bonaparte - "Never interrupt your enemy when he is making a mistake." The game ended up being a 4-3 victory for the West Germans, but I picked up some slop points near the end once the game was already pretty much decided.

So in the spirit of accountability... our report follows!


Summary of the Court Martial Proceedings of Major Ivan Yakovlev

Accused is asked, "You are charged with gross dereliction of duty and cowardice in the face of the enemy, how do you plead?"

Accused pleads "Not Guilty"

Accused is asked to describe the planned attack in detail...

My armored battalion had broken through north of Amsterdam, but British, West German, and Dutch resistance was increasing and threatening to push us back out of The Netherlands. My group, on limited rest, was ordered to attack south toward Grijpskerk and Bedun north and north west of Groningen. We had set up temporary command posts at Kloosterburen and Waffrum, and it appears that NATO forces were targeting our command centers as we were targeting theirs...

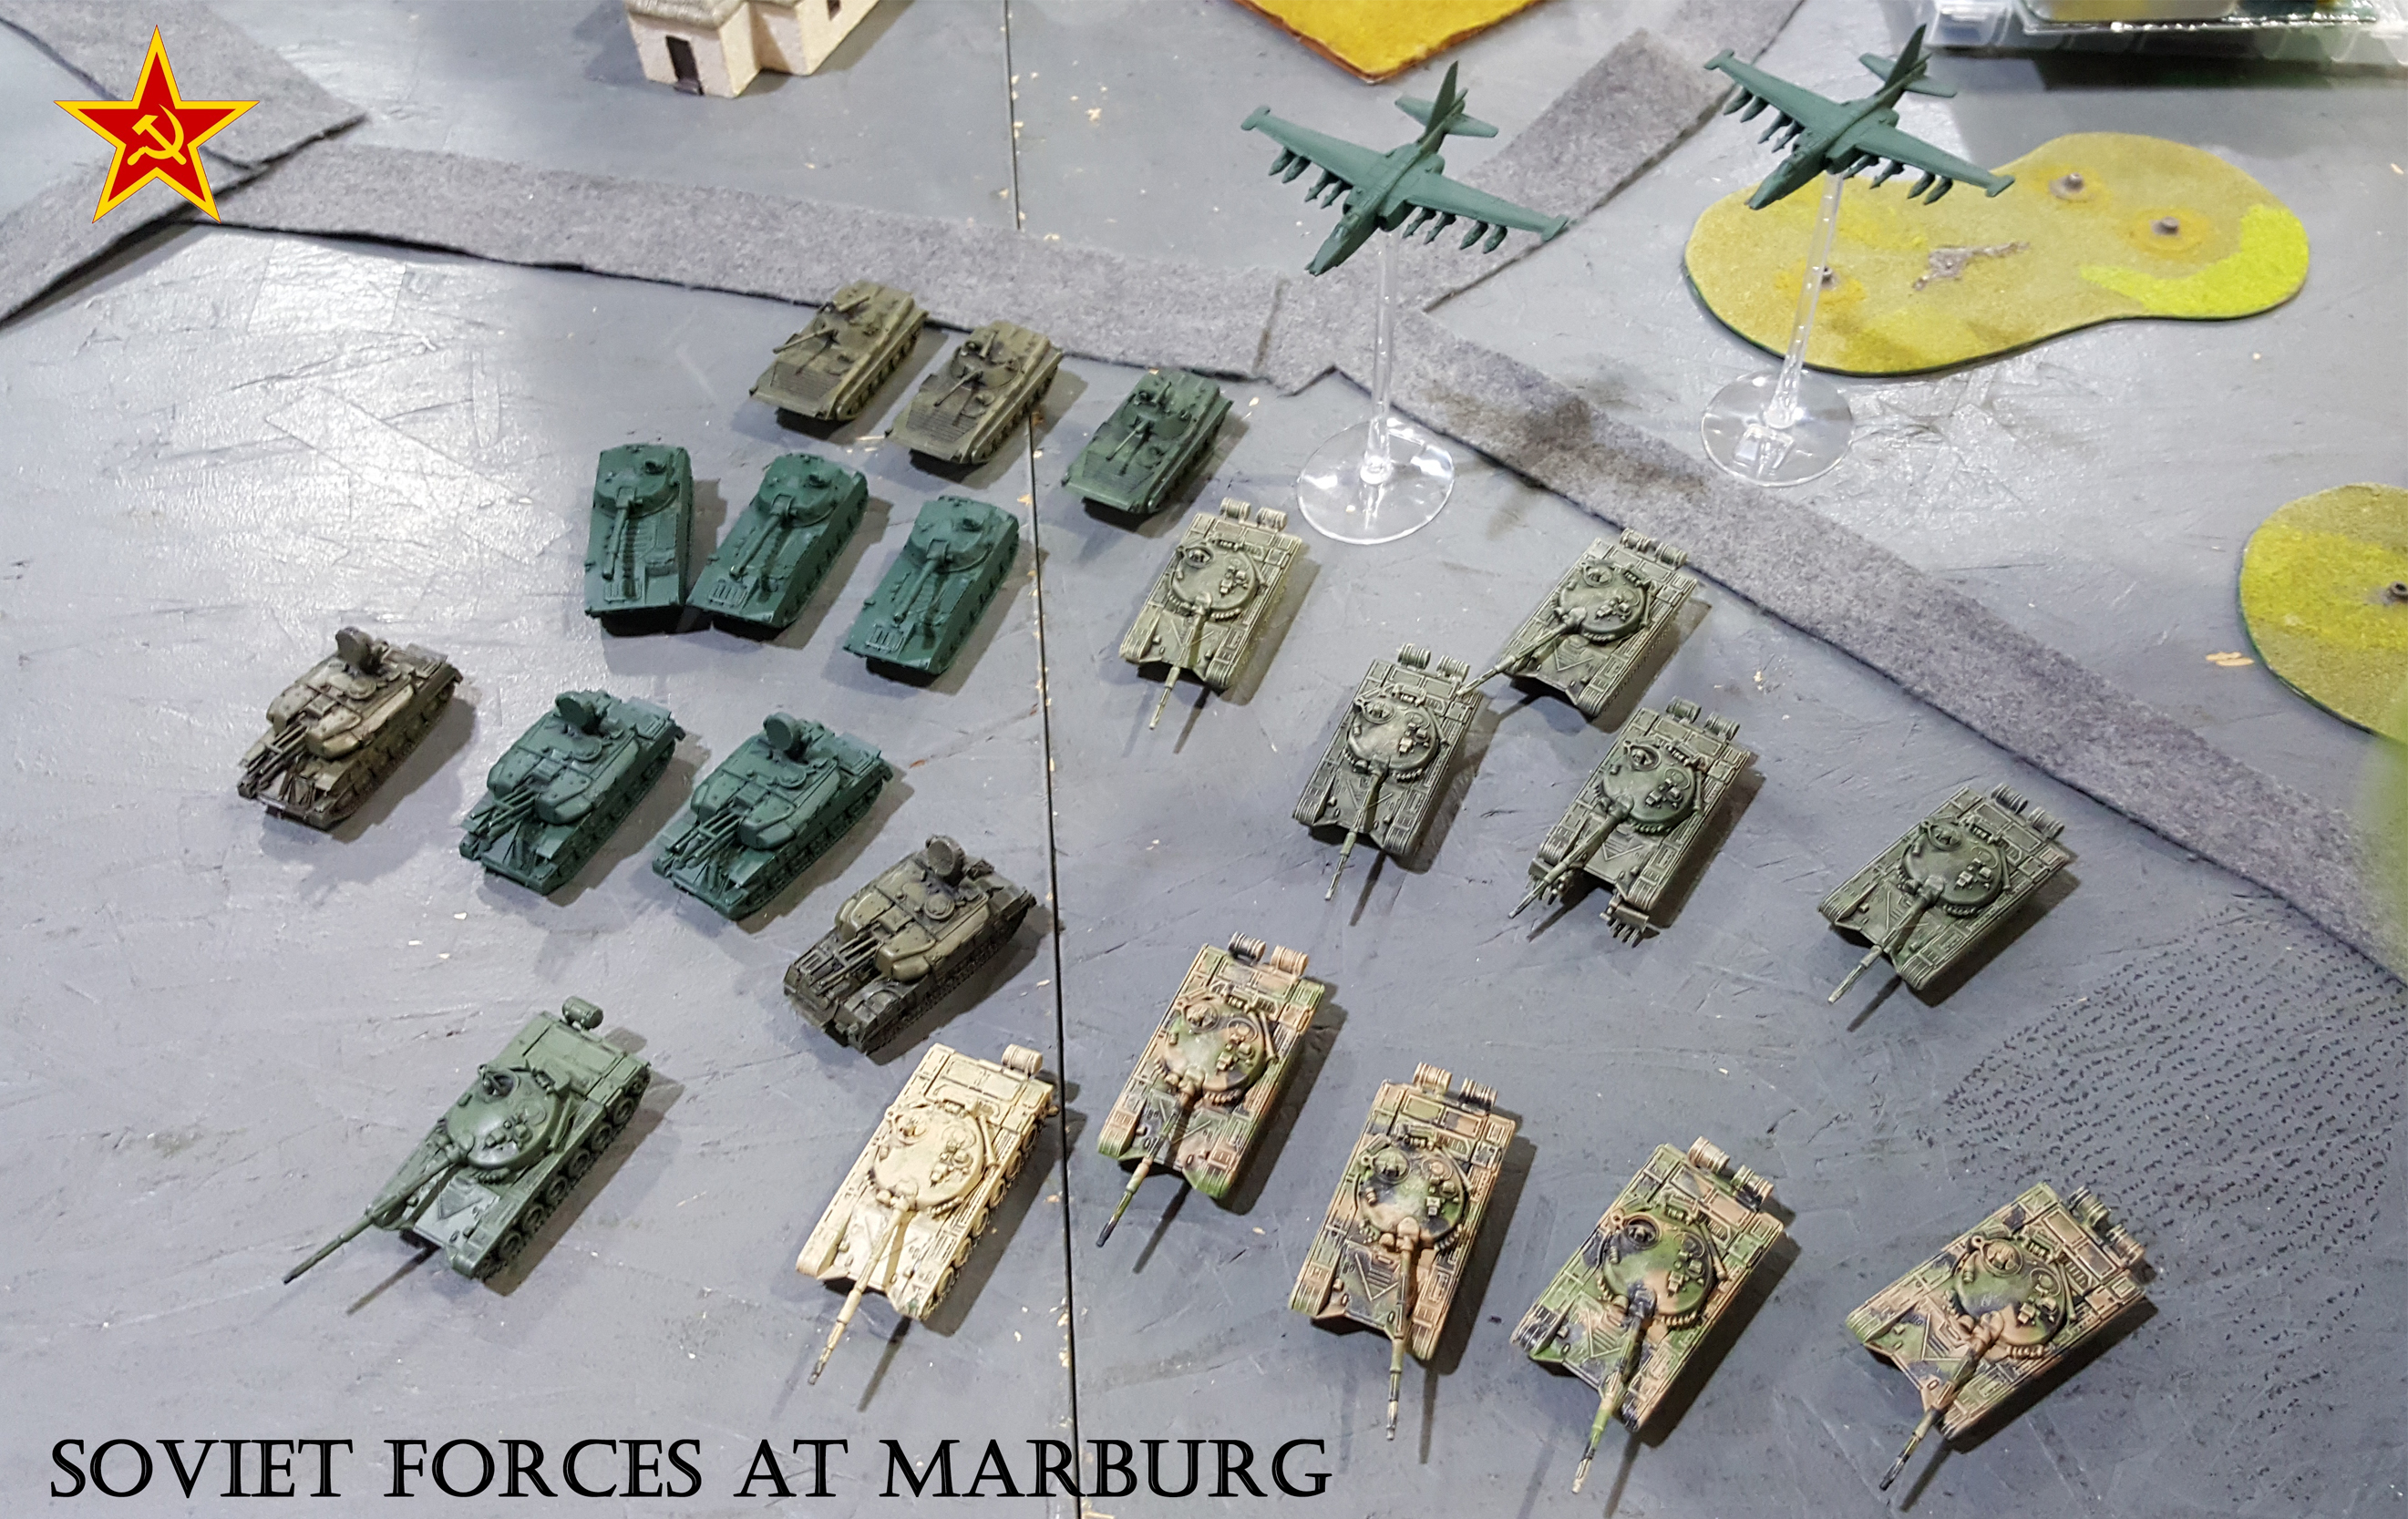
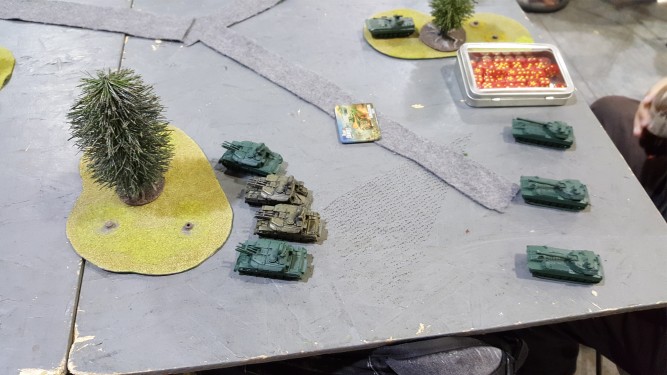
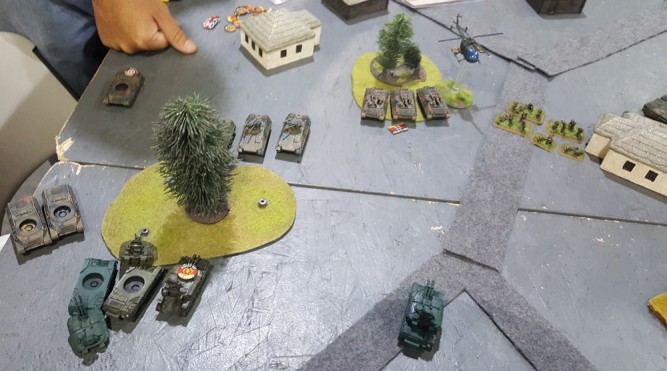
Soviets attempting a deep penetration attack

Accused is asked, "What forces did you have available to you?"

Accused indicates that his total forces were three short companies of T-64 tanks, one Shilka battery, and a reconnaissance platoon of four BMP-2. His T-64 tanks were not armed with missile guidance systems, only guns. However the BMP-2 were scouting to the east and were not available immediately, and two of the three companies of T-64s were being re-armed and re-fueled when the attack order came.

Accused is asked, "Why were your forces in such a poor state of readiness? I'm told your Shilka battery failed to detect and engage enemy air power until they had already decimated your first company!"

Accused indicates that his armor had been fighting a running battle for several days and while the logistics company was working as quickly as possible, only one of the three tank companies had been readied for immediate deployment. He offers no excuse for the failure of the Shilka battery to immediately engage when they heard the rotors of the enemy helicopters.


Accused is asked to describe available enemy forces.

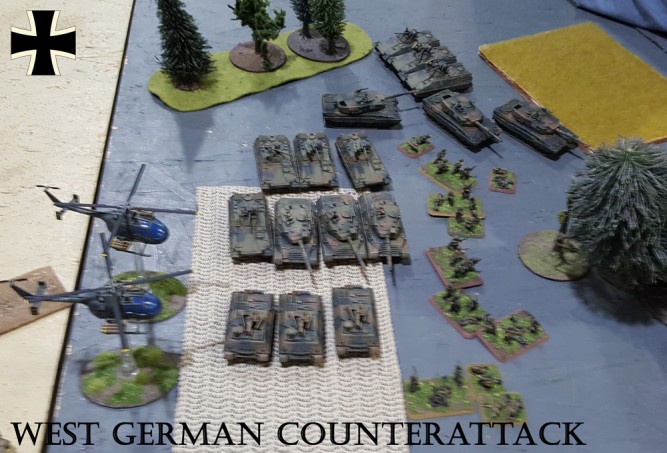
Accused indicates he was facing a mechanized infantry formation which was dug in near Grijpskerk while the approaches to Bedun were covered by Jaguar Jagdpanzer platoon. All of these troops appeared to be Bundeswehr. The ground forces were covered by patrolling PAH anti-tank helicopters, but it was unclear whether these were German or Dutch.

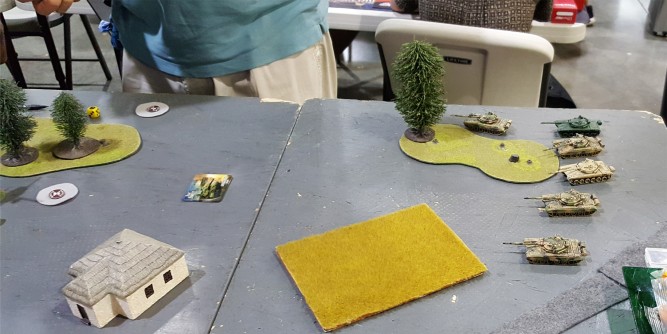
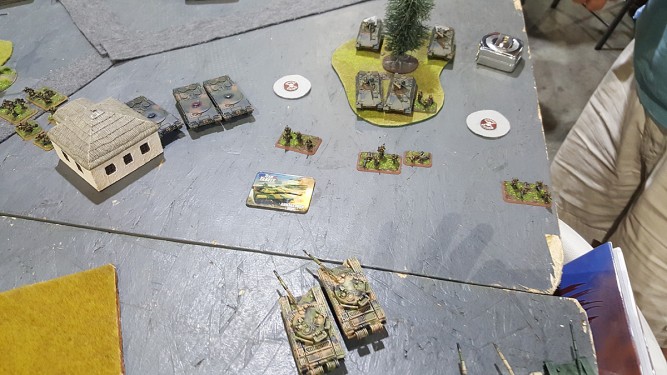
German forces in The Netherlands - don't let the terrain fool you!

Accused is asked, "You saw no other forces, no armor support? No additional mechanized infantry?"

Accused responds that he suspected that there was at least one more platoon of mechanized infantry and some armored support in the area, but no intelligence was available on the exact disposition of the enemy forces. He had hoped to secure one or both objectives before the enemy could call on reinforcements...

With limited forces, the Soviet commander tries to play a waiting game...

Prosecution states, "So you started the battle in passive positions, with your anti-air assets sitting ON their 'assets,' what, hoping the enemy would come to you?"

Accused states, "Given the strength of the enemy anti-tank weapons, I felt it prudent to conserve my forces until I could bring more strength to bear. The enemy was dug in and held excellent defensive positions, and their weapons outranged my own, to assault openly at this juncture seemed like suicide."

Prosecution states, "And yet you were already in range of the PAH helicopters, and didn't even know it! You nearly lost a company of tanks before you even moved a centimeter!"

Smile! You're on candid missile targeting camera!

The accused indicates that while that is indeed true, at this point the action seemed to turn around. The Shilka battery surged forward shooting down one of the enemy helicopters...

"After they'd destroyed one of your precious tanks!"

The accused offers no excuse, but continues, "this forced the remaining helicopter to withdraw and cover the mechanized infantry, ultimately allowing us to begin our advance."

Shilkas attempt to redeem themselves

The prosecution continues, "So the Shilka battery manages to finish off the enemy anti-tank flight, and the two tardy companies of T-64s arrive in theater. What did you do at that point."

The accused states, "At this point I believed I had enough armor to begin a general advance toward the enemy positions at Grijpskerk. Our initial advance was somewhat wary because we believed that there was enemy armor in the vicinity. However we could not be too wary because the enemy infantry was equipped with Milan missiles which were capable of defeating even the armor of a T-64."

The prosecution states, "So you were faced with a command decision, a decision an individual in your position is expected to make daily!"

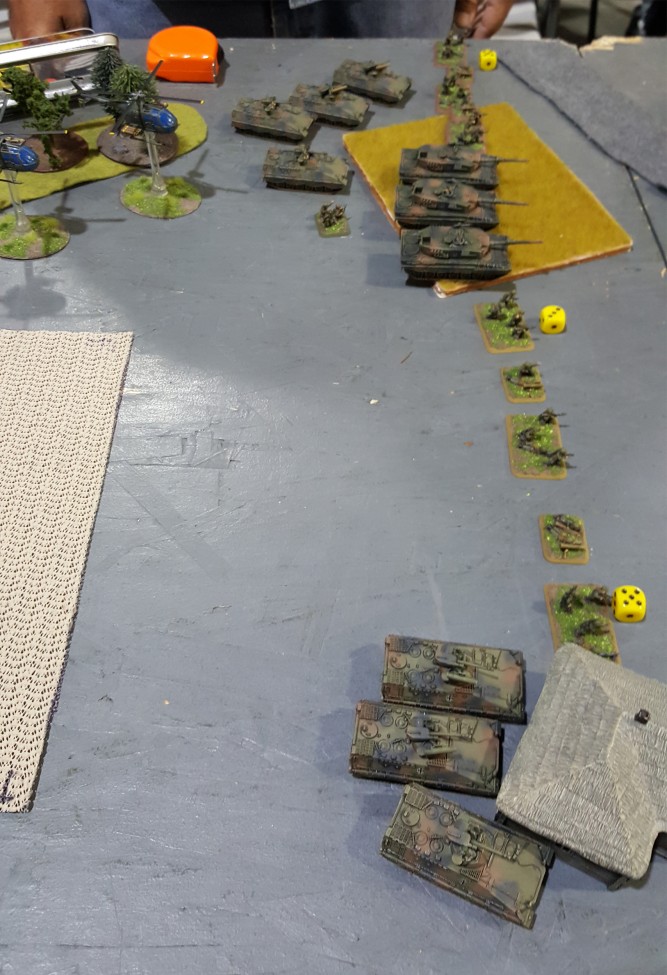
Soviets begin an advance on the right flank - right into the teeth of Milan fire!

The accused offers no excuses, and is asked to continue...

"After no enemy reinforcements arrived, I ordered the three companies forward in hopes of securing the objective before enough enemy arrived to dislodge us, we managed to destroy their Milan missile teams and were ready to close in on the mechanized infantry themselves when..."

"DISASTER!"

"Yes Comrade General, disaster..."

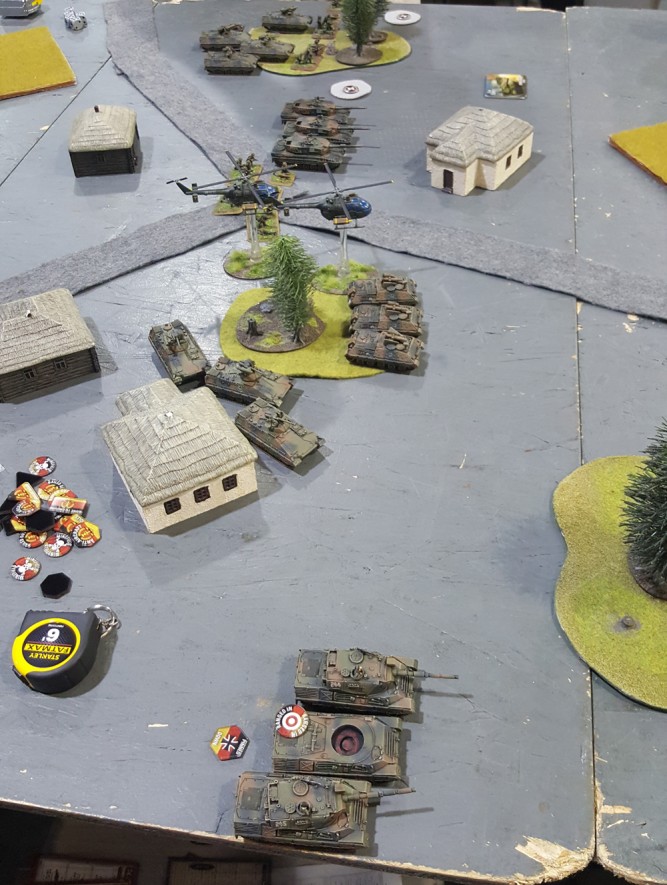
Good sights on those Leopards, eh?

"Would you care to explain to the Court exactly how three Leopard tanks got behind all of tanks, and knocked out four of them, with one more damaged before you were able to react? Where were you during this exchange of fire!?!?"

The accused mutters something unintelligible.

"I'm sorry, I didn't hear that, will you repeat clearly for the Court!?"

"I was covering the approach to Waffrum, our entire right flank was exposed at that time..."

Prosecution states, "... but you already had radio reports from your reconnaissance team that they were on the way and could cover either flank."

"I was... unsure they would arrive in time..."

"Yet they did, and what were your orders for them?"

"I believed they could get close enough to outflank the Jagdpanzer as their side armor is weak."

"And DID they?"

"They got close enough, but..."

"Yet ANOTHER disaster???"

To quote the old Batman movie, "where does he get all those wonderful toys????"

The prosecution continues, "so you threw away a perfectly good unit of BMPs to no good outcome, leaving what? What exactly, Comrade???"

"One company of two T-64s and my own command tank," the accused replies.

"One of which is soon destroyed by the Leopard 1 platoon you've failed to dispatch."

"Yes, Comrade General, but we ultimately do destroy not only that platoon, but the second platoon of Leopard 1 tanks as well before the last company tank is destroyed by a Jagdpanzer."

The prosecution asks, "How could you let the enemy armor outflank you so readily?"

"Comrade General, intelligence had indicated that the enemy was in disarray - they had no ready reinforcements, much less that their reinforcements could pinpoint the best possible position to assail our forces from."

"Are you blaming poor intelligence for your failure of command!?!???"

The accused offers no excuse...

Revenge is a dish best served cold... but from what I hear it's not exactly "cold" on the inside of a Soviet tank...
The prosecution continues, "So yours was the last remaining tank... the last remaining vehicle... the last remaining crew out of your entire command. What did you do next?"

"Comrade General, I fell back to our command center near Leer, gave my report, and turned myself over to the appropriate authorities..."


Final Notes and Battle Honors... or Horrors in this case...

Well that didn't exactly go to plan - too cautious in the early game, too aggressive in the mid game, and too little too late in the end game. At the end of the day I'd lost well, pretty much the entire bloody force, but I'd taken out his Helicopters and both platoons of Leopard 1 tanks. I honestly thought I had at least one company positioned to where all he could get were frontal shots on it if on the off chance he rolled that "1" or "2" on his scattered reserve roll... which of course he did... and of course I'd badly muffed my armor angling as well. Ryan's luck came through again with that "5/6" roll for the second Leopard platoon, though honestly their butts were hanging out wide in the open and that was a really bad call on my part.

So now you can be the judge and convict or acquit the Major!

So at the end of the day, it was the Leopard 1 (which is one of the true unsung wonders of Team Yankee) that carried the day for Ryan (playing Zeke's) West Germans. So in honor of their contribution, here's a short video of a Leopard 1 at Samur from 2013...


Friday, September 1, 2017

Soviet End Run at Frankfurt - A Team Yankee Firestorm After Action Report

The Red Thunder Firestorm campaign has entered its third phase, and while the Warsaw Pact has made strong inroads in the north, but the advance has bogged down in other areas. Complicating matters, the Pact push into the Netherlands has met with strong resistance with NATO currently holding a slight edge in that theater. It was another great night of pushing army men around at Guardian Games, but more on that in the Preamble. If you want to go and rate the actual battle report itself, hit up the main campaign site

Preamble

The regular bunch met up at Guardian Games again last night for another great evening of Flames of War and Team Yankee. My friend Ryan (Lazarus) was there and brought some of the new T-64 tanks and some of his U.S. Mechanized Infantry. We went ahead and tried the Frankfurt Gauntlet mission, although we both had a few reservations about it - especially since he didn't take one of the new scout formations for the U.S. Turns out the mission is very difficult for a U.S. player if he or she doesn't actually have spearhead, and we'll likely be playing a different mission this weekend. As always, Ryan was a great sport and always brings his A game to the table.

Frankfurt Gauntlet Forces

American Force

M113 Mech Combat Team – (1 point)
M113 Mech Platoon – full with Dragon missile team (7 points)
M901 ITV Anti-tank platoon (3 points)
M1 Abrams tank platoon – 4x M1 (32 points)
M109 Field Artillery Battery – 3x M109 with bomblets, minelets, laser-guided projectiles (10 points)
M113 FiST – (1 point)
Total:  61 points


Soviet Force

T-64 Tank Battalion – 1x T-64 (6 points)
T-64 Tank Company – 3x T-62 (13 points)
BMP-2 Recon Battalion – 2x BMP-2 (6 points)
2S3 Acacia Heavy SP Howitzer Battery – 3x 2S3 Acacia with Krasnopol Projectiles (7 points)
BMP-1 Observation Post – 1x BMP-1 OP (1 point)
ZSU-23-4 – 2x Shilka (2 points)
Total:  61 points


Major Mikhail Tupolev’s Personal Journal

Saturday, 10 August 1985

After securing Marburg, I ordered the men to maintain and re-supply all of their equipment in anticipation of continued combat in this sector. Despite strong gains, the Americans and West Germans were still putting up stiff resistance, and our push to the Rhine and beyond has been delayed yet again. I was just sitting down to breakfast when new orders arrived via staff vehicle.


Given the urgency of the situation at the front, I had little time to say my goodbyes to the men and congratulate Alexi on his promotion. I, however, leave knowing that the unit is in good hands and that they will go on to great success.

Arriving at my unit, I realize how desperate the fighting around Frankfurt has been. A battalion of advanced T-64 tanks has been reduced to ten operable vehicles, with a further three or four in repair. While we have reconnaissance, AA, and artillery support, I'm informed the infantry was decimated in the last attack and will be unavailable for the upcoming battle. Inspection of the surviving tanks shows they are in reasonably good condition, but are not equipped with the guidance systems for the Kobra missile meaning that NATO tanks will likely still out-range my forces. Second Echelon forces are on their way, but have not yet arrived at the front.

My orders are to push through a gap between Marburg and Frankfurt, this should open the road to Wiesbaden and Mainz allowing our forces to encircle and reduce Frankfurt and its airport. We can then push on to the Rhine and into Belgium trapping remaining NATO forces in Germany in a pocket in the Ruhr with no easy source of supply.


11 August, 1985

We move out before dawn and head southwest. Our reconnaissance squadron indicates that American forces have been active in the area of Nieder-Oberrod, and that there may be a key supply dump and forward communication center in the area.

Table Layout Courtesy of Boss!  Thanks for getting in early!

As we approach the town, it appears that an American mechanized infantry company is in the vicinity, but has moved away from the town. Perhaps they had been moving out to attack our forces further south at Frankfurt? Either way this represents a key opportunity to disrupt the American rear lines and pave the way for a breakthrough in this sector. Apparently alerted to our presence, the Americans have turned around and will not simply let us waltz in to the city.

Tactical map at Nieder-Oberrod showing locations of key untis

The Battle at Nieder-Oberrod

American forces were well-deployed to cut off our advance toward the city. American anti-tank AFVs were well-hidden in a row of trees overlooking several agricultural fields. We could also barely see one of their heavy armored artillery vehicles at the edge of the woods as well. At least one company of mechanized infantry supported by four M1 tanks is poised to move into the town itself.


Our own forces consisted of ten T-64 tanks, a Shilka battery of two vehicles, a reconnaissance team of four BMP-2, and a battery of the heavy 2S3 Akatsiya self-propelled howitzers. If we are able to get into the town and secure the objectives, we should be able to hold off any counter attack, but if the American mechanized infantry is able to infiltrate the town, the house to house fighting will invariably subject the flanks of the T-64 tanks to attack by infantry anti-tank weapons. We must drive to the city as fast as possible.


The reconnaissance unit leads the way for two of the reduced-strength tank companies to approach the town. I hold the third company in reserve in case the American tanks try to circle around and trap our armor in a crossfire. The improved stabilizers on the T-64 is a welcome upgrade as it allows me greater flexibility in deployment.


The Americans advance on the city, but their M1 unit splits to try and deal with the two reduced companies of T-64s along the way. The reserve company of T-64s was apparently identified by an artillery observer as rockets fired by their 155mm howitzers begin falling in our area. Fortunately no hits are scored, and it alerts me to the more immediate danger. Their anti-tank AFVs fire missiles at our formation, but the one hit scored glances off the hull of one of our tanks.

We start to move into the town to first secure the supply dump. American forces in this sector have been hard pressed over the past days, and it is unclear whether they have received any reinforcements yet. If we can secure their forward bases of operation, they will have no choice but to give ground. The reconnaissance team fires missiles at the enemy anti-tank team and observer team. The missile fired at the observer team goes wild and ends up in some trees, but one of the missiles strikes an AFV. From my vantage point it didn't appear to destroy the vehicle, but the crew evacuated the vehicle and the second vehicle withdrew.


With the enemy heavy artillery announcing its presence, our 2S3 Akatsiya battery was able to zero in destroying one of the enemy guns. Our other forces continued their way toward the town. Given the lack of American air power, I sent the Shilka battery on a flanking run to harass the enemy softskins and artillery, but now with their mechanized infantry working their way into the city, I wonder if I haven't made a poor decision.

Counter-battery fire finds its mark!

The Americans continue their advance toward the down trading shots with their Soviet counterparts, costing us one T-64 destroyed and another shaken. The battle-weary company asked for permission to withdraw, but I ordered them to hold as they had substantial support. Our forces finally make their way into the town and locate a small supply center in the north eastern zone. The sentries attempt to check our advance with small arms fire, but they have nothing which can damage our armor.


We are able to bring a couple of their APCs under fire destroying two, but it appears all of the troops make it out alive. As expected, the Americans are going to try and turn this into a city fight with their infantry taking up firing positions in the buildings around what intelligence is calling a communications center. We have to be very careful not to expose our sides to their anti-tank teams or we'll be forced out of the city.

Mechanized infantry moves in, but to AFVs are lost!

The American M1 tanks push their way into the city and open a hellish volley of gunfire. I'm certainly glad the Americans are still using the old British 105mm gun - I can't imagine how effective these tanks would be with a 120mm! A second T-64 is lost, this time from 3rd company, and 1st company takes such a pounding all three tanks are temporarily out of action. I immediately radio the commander and order them to hold at all costs, we are in a position to completely outflank the American armor if they can hold. The company quickly recovers and is soon active again.

With American infantry beginning to infiltrate through the town, the key is to eliminate the American tanks as quickly as possible, the infantry will then likely break off rather than be overrun by our forces. At this point my T-64s are in a position to envelop the American tanks, destroying three of them. The remaining vehicle flees allowing us to begin to secure the supply depot. The American infantry begins to withdraw from the town leaving us victorious.

With the loss of armored support, the American infantry begins to withdraw

While we are now in control of the town awaiting further orders, I remain concerned that we were not able to eliminate the American infantry. Our total losses were a mere two tanks, but my companies are already vastly understrength. Enemy losses were somewhat higher, but our goal is a lightning victory - not a long war of attrition. We must push on further and faster to complete the final liberation of Europe.


Final Notes and Battle Honors

This was the first time I've used the T-64 formation, and I didn't equip them with the Songster missiles. Overall I liked them - they are a bit more flexible than a T-72 because of their higher speed. There was only one opportunity that having the missiles would have come in handy on this mission - because of the victory conditions, this particular game was destined to come down to a knife fight anyway where having a lot of long-range firepower in your core units was less important.

Speaking of the mission - if you're the NATO player, you really need to have something with Spearhead, because if your opponent has it, you'll start the game with one hand tied behind your back. Even having pre-ranged in artillery isn't enough of a boost to keep Warsaw Pact forces scraped off of the objective long enough for you to whittle them down and push them back.

Ryan was an amazingly good sport during this game as his key rolls generally came up poor while my key rolls generally came up good. I'd fully expected to sacrifice one or two of the T-64 units to destroy his Abrams platoon and use the third with the commander to hold the objective and keep the infantry backed off. I benefitted from no small amount of good fortune which resulted in the 6-1 victory.

Battle Honors!

Again, this was pretty much a team effort with only the Shilka battery uncharacteristically contributing nothing to the game. While the T-64 tanks did the lion's share of the heavy lifting, the BMP-2 recon team was what 1) allowed the T-64 companies to be in a position to quickly move on the objective and 2) scored a lucky hit on an M901 bailing it which led to their early exit from the game - otherwise they were in a perfect flanking position. So in honor of their contribution, here's a video on the BMP!


Monday, August 28, 2017

Spam - or How to Max/Min your Army Without Even Trying

Once upon a time a long time ago, there was a canned meat product called "Spam," that turned out to be easy to deliver to American troops during World War II. It became ubiquitous during that conflict and its popularity continued post-war. Eventually "spam" referred to more than just the branded product and ultimately referred to various canned meat (or "mystery meat") products. Then in the 1970s, the British comedy group Monty Python took up the call...


In honor of this sketch, with the advent of the internet, unsolicited emails became known as "spam." Not to be left out, the gaming community (online and otherwise) adopted the term for any repetitive action or repetitive use of an item - usually to create some advantage in the game.

One of the beauties of Flames of War in V3 and earlier was generally players were required to build their force from a single army list. Because the force levels in any particular list were fixed, it became very hard to "max/min" lists to gain an advantage in the list creation step. This began to change in the Team Yankee rule set which permitted players to take multiple formations, and has been carried through to Flames of War V4. Now players are not limited to one or two force organizations and can instead bring, theoretically, as many as they like as long as they meet the minimum requirements for each force.


From a game design perspective, this makes it very hard to balance the respective forces. While an overall single formation list may be balanced, enterprising players will find ways to take the minimum number of points for multiple formations to maximize their firepower on the table. In general this technique is referred to as MSU, or "Multiple Small Unit" (no offense to my fellow Mississippi State University alumni!).

For example - a single unit of three Leopard 2 tanks costs 33 points. Playing East Germans, I could use multiple small formations to create the following list:

T-72M Panzer Battaillon
1x T-72M (3 pts)
3x T-72M (7 pts)
3x T-72M (7 pts)
3x T-72M (7 pts)

T-55AM Panzer Battaillon
1x T-55AM (1 pts)
3x T-55AM2 (2 pts)
3x T-55AM2 (2 pts)
3x T-55AM2 (2 pts)

...and still have 2 points to play with to use for Spandrels, AA, or recon...

While this is an extreme case (among the most expensive NATO MBT facing off against the least expensive Pact MBTs), in a larger tournament or campaign, it wouldn't be unreasonable for a player to go such a route. While it is accurate that Pact forces typically outnumbered their NATO counterparts, it wasn't by that large a degree.


In a tournament setting, such lists are often self-correcting. Because they contain many small units, they will "bleed victory points." It will be hard to get 6:1 victories because you will almost always tend to lose a few units. That being said, it will likely be easier to win with such formations, and if you're good (and fast), you may be able to stave off enough casualties to score well.

So what is the solution? Well, honestly to pose a solution there has to be some consensus that there is a problem. While you may be able to get more individual units at 100 points by using MSU, you're not going to get more space to deploy them - which means you're going to run out of space in some missions. Quantity also has a quality all its own - large units can be hard to break. So an argument can be made that one or two formation lists can be equally effective.

In the end I think we're going to need a fair amount of data to understand the actual impact of MSU on game play. I'd hypothesize that they will be more effective at small point values - especially if the opponent has taken high-priced units - than they would at larger point values. That being said, I do think we'll see some tournaments experimenting with limiting the number of formations allowed in lists.

Saturday, August 26, 2017

DDR BMP-1 OP - or - Advanced Moldeling Syndrome "Hold My Beer, I'm Gonna Try Somethin'" Edition - Part 1

It's an innocuous enough unit in Team Yankee, the BMP-1 OP. It serves as an observation post for any of your artillery units. It will pretty much sit there the whole game unless your opponent truly has nothing else to shoot at, or needs to find a way to nerf some particularly effective artillery - which is fairly rare. However, if you take a look at the stats or card for the unit, you'll notice something a little unusual:


The picture of the unit shows a normal BMP-1, though it has a few additional "dot" abilities at the top of the card. However if you look at the weapon entries, or in this case entry, surely there has to be something odd going on. There's no 73mm 2A28 gun. There's no AT-3 Sagger missile. So what's up? Well, it turns out there's a good reason that the OP version only has the machine gun armament - it's a different variant of the BMP-1.


The most common command and control variant of the BMP-1 is the BMP-1KSh (pictured above).  (EDIT:  ... and I've since discovered that the artillery units generally didn't use it, instead they had an alternate vehicle used for observation... more on that in a future blog - this baby's still getting done even if I just use it as an objective!)  You'll note it does away with most of the armament of the BMP-1, though it does retain a 7.62mm machine gun for close in defense. So I decided, "what the heck, why not convert one." I mean, after all, how hard could it be? Well, there's a reason this is called the "Hold my beer..." edition.


Using photos of the real thing along with images of a few 1/35th and 1/72nd scale kits as reference, I began to map out the project. The first thing I needed to do was remove the rear top doors and a few other details. The turret also needed to be re-worked a bit so I sanded it and then used Mr. Surfacer to fill any remaining holes. I also began work on a couple of stowage boxes (to the right of the photo above) which will end up on the back edge of the vehicle.


Once the Mr. Surfacer had time to dry I sanded it back ended up with 600 grit wet/dry sandpaper for a smooth surface. As this variant also uses the BMP-2 hatch, I got it ready to attach to the vehicle. After sanding I went ahead and glued on the turret, which is fixed in this variant.


Another key feature of this version is the very tall antenna mast which I'm modeling stowed as raised would be a foot tall or so! Some of the mast appears to be held in brackets on the top deck, so I used styrene rod and tubing to create it - capping the ends with circles punched from sheet styrene.


Once I had the ends on, I used some scrap photo-etched brass to create the brackets:


Then the fun truly began, I started putting it all together and working on some of the detailing I first had to build a small bracket for the middle stowage box (which you can just see underneath it).  I also added some tie downs for the turret itself (I've seen pictures where tarps or other bags have been attached to these - though the number and placement seem to vary greatly).


Once the mast was added to the rear deck, I began work on the front antenna. This was built with a combination of brass rod, aluminum tube, copper wire, and sheet styrene carefully punched and sanded to create brackets.


In the photo above you can even see what appears to be a winch to raise and lower the mast assembly. At this point I'm working on the last part of the forward antenna (seen in the photo below - the green putty will need overnight to dry), and I still have to build a few more detail items yet.


All that being said, this one is actually getting fairly close to being done and into the queue with the rest of the Volksarmee "stuff" which is awaiting paint. Stay tuned for "finished photos" of this fun little conversion, which has taken way too much time but I've enjoyed every minute of it.


Friday, August 25, 2017

Defensive Battle at Marburg - A Team Yankee Firestorm After Action Report

The Firestorm Red Thunder campaign has entered its second phase. Soviet forces have taken Denmark and are advancing on Frankfurt and Bremen. Locally, it was another great evening at Guardian games – several players were out this evening with 2 players in a Flames of War desert battle and the other four of us battling it out on the neighboring table. Tonight was a real treat because I got to play against my friend ZEKE from CGR Painters and his absolutely stunning West German force with Barca as his deputy commander. Jeffrey served as my political officer this time around to ensure I upheld the honor of the Soviet Army.

As you've seen from other posts this week I'm still working on getting my DDR forces together. I'm going to probably focus on infantry this next week and try to get some stands together. I think the BMP-1 teams will do well.

So without further ado - here is the latest from the front lines! If you're a part of the campaign, you can check out and rate the battle at the firestorm site.  

Forces:

Bundeswehr Force

Marder Company Command – 1x marder (1 point)
Marder Platoon – (7 points)
Leopard 1 Platoon – 3x Leo 1 (9 points)
Leopard 2 Platoon – 3x Leo 2 (33 points)
Jaguar 2 Platoon – 3x Jag 2 (5 points)
PAH – 2x PAH (8 points)
Total: 70 points

Soviet Force

T-72 Tank Battalion – 1x T-72 (5 points)
T-72 Tank Company – 5x T-72 (22 points)
T-72 Tank Company – 5x T-72 with one mine clearing device (23 points)
BMP-2 Recon Battalion – 2x BMP-2 (3 points)
2S1 Carnation SP Howitzer Battery – 3x 2S1 Carnation (5 points)
BMP-1 Observation Post – 1x BMP-1 OP (1 point)
ZSU-23-4 – 4x Shilka (4 points)
Su-25 Frogfoot – 2x Su-25 (7 points)
Total: 70 points


Major Mikhail Tupolev’s personal journal

Wednesday 7 August 1985

Despite our victory north of Hanover at Kröpke, NATO forces in that sector continue to stymie our advance. NATO air power has been far more decisive than the Red Air Force ever gave it credit for, and particularly hampered our efforts in that region. However, the glorious Red Army had greater success to both the north and south, and our forces have been ordered south toward Frankfurt to exploit our breakthrough at the Fulda Gap. Our forces are ready, and have been supplemented with ZSU-23-4 Shilka anti-aircraft tanks, and we have been informed we may call upon Su-25 Grach strike aircraft of the Soviet Air Force in the days ahead.


Thursday 8 August 1985

We have been ordered to secure the small town of Marburg north of Frankfurt and serve as a blocking force to run interference for units attacking Frankfurt itself. From our position at Marburg we can continue West toward Bonn, Cologne, and Düsseldorf or wheel north to pressure the positions near Hanover.


Marburg itself is lightly defended and most of the city is quickly pacified. It is an old city with a castle overlooking most of the town. The town itself is situated in a valley. We set up a command post just west of the ridge at the far edge of town and await further orders.

Thursday Night 8-9 August 1985

Our reconnaissance unit reports enemy units closing in on our position. A quick call to headquarters confirms that a Bundeswehr force is closing in on our position apparently with orders to retake Marburg and disrupt the overall advance towards Frankfurt. We are ordered to repel this attack at all costs to allow time for the units to secure Frankfurt.

Frankfurt Sector Situation Map

I order our forward observer post to mine the immediate approaches around its position and await their report on the disposition of the enemy force. Unfortunately, it is an extremely dark night and we’re forced to rely entirely on night-vision equipment to assess the situation. Complicating matters is the fact that my own forces are currently scattered. The Gvozdika battery is in position along with its observer as are the Shilka and one company of T-72 tanks, but the other T-72 company is mopping up some stragglers south of town while the Reconaissance platoon is still making its way back to our lines. Who knows where the Air Force is – calls to them go unanswered.

Commander and T-72 First Company

I position my command tank alongside first company near a small wood to provide us cover until the enemy reveals himself. We are in a position to relieve the forward observation post if the West Germans venture too close. The Gvozdika battery and Shilka are just to the south around the artillery command and control area. Hopefully the Germans will be cautious and give us time to mount a proper defense.

Anti-aircraft and artillery prepare to defend the command post

Our scouts report the enemy is in sight. It appears to be a mechanized infantry company with armor support – including at least 3 of the Leopard 2 tanks – technical marvels that are extremely difficult to kill. The scouts also report hearing rotors, so there will be helicopters incoming as well. I immediately order the Shilka to be ready!


It appears as if the Germans are planning on advancing across a broad line. Their Leopard 2 tanks are positioned to attack 1st Company, while what appear to be the lighter Leopard 1 tanks are on the south flank working their way toward the anti-aircraft battery and artillery. If I were their commander I'd come in hard and try to push us back before we can mount a reasonable defense - I hope his intelligence is faulty and we're able to bluff him into giving us more time!

Leopard 2 tanks anchor the line

Given the whine of the German engines, it appears that the enemy commander knows that we're spread thin and is coming in at best speed. In the pitch black of night even their gunners will need to get close before they can open up on our forces, and the enemy commander is apparently wasting no time closing that distance. At this point all I can do is try to preserve my forces - moving the tanks out of cover would be suicide against the German 120mm guns, and all of these tanks will be needed to push back this force. The Leopard 1 tanks are meanwhile getting dangerously close to the artillery and anti-aircraft forces.

Leopard 1 tanks working the flank

With enemy forces closing in rapidly, my political officer is getting nervous about my apparent inaction. I have received radio transmissions indicating that 2nd Company and its T-72 tanks should be here soon, but it can't be soon enough. As if two armored units bearing down on our position wasn't bad enough, we can now see those accursed anti-tank helicopters lurking about just out of range. Adding insult the Leopard 1 unit begins taking out the Shilka battery with the loss of one. The flashes of their main guns, however, allow the Gvozdika to range in and one of the enemy panzers is set ablaze!

One burning panzer!

All is not well however, 2nd Company has been further delayed allowing the West German forces to navigate around the minefields and threaten our forward observer post. German gunnery was also strong with one T72 from 1st Company destroyed when it peeked past the woods to begin lining up shots on the Germans. Our only hope is the dawn and reinforcements, else this will be a very uncomfortable debriefing - if we survive at all!

German forces threaten the forward observation post!

As dawn breaks across the battlefield, I can truly see how desperate our situation is - the West Germans have moved up to our forward observer post. Leopard 1 tanks threaten our southern flank as well as the Shilka and Gvozdika batteries - with two Shilka having already been lost and a third temporarily out of action. Attack helicopters are advancing up the center of the battlefield and will soon threaten our forces from all sides. Now is the time for desperate action! Just as I began to order the advance, I heard the roar of Soviet diesel engines heralding the arrival of 2nd Company's T-72 tanks. Now we may just have a chance.

Given the close proximity of the Leopard 1 tanks, I order the Gvozdika battery to fire directly at the encroaching panzers resulting in their destruction. The remaining active Shilka braves fire from all directions and draws a bead on the Wessi helicopters, destroying one and driving off the other.

Charge of the light bri... err... the Shilka!

With ten T-72 tanks at my command, we advance and bring the mighty Leopard 2 tanks under our guns destroying all three. I would have thought the Great Patriotic War would have taught Fritz that technological marvels alone can't win wars if they aren't fielded in sufficient quantity! Give me a rugged, simple tank with a hard hitting gun that is simple to maintain any day! The only concerning issue is that the Red Air Force continues to be absent from the battlefield.

Leopard 2 tanks destroyed!

Though the greatest threats to my force have now been eliminated, the enemy still has enough anti-tank assets to tear us apart if we don't tread carefully. Both the Gvozdika and Shilka batteries are wiped out by West German anti-tank rockets, though the T-72's manage to shrug off multiple hits! My focus now is to eliminate their anti-tank vehicles which will allow the battalion to mop up the infantry at our leisure.

Jaguar 2 formation nearly wiped out!

In a final desperate bid to secure the rear command post, the Germans pushed their mechanized infantry transports forward, but the timely, though belated, arrival of the reconnaissance platoon made short work of them. And yet again, the Red Air Force was absent.

Burning wrecks litter the rear command post

With their anti-tank assets effectively eliminated, the few remaining German infantry either withdrew or threw down their arms. It was a hard fought battle, and we were nearly pushed back by sheer weight of numbers - but the timely arrival of 2nd company allowed us to hold out, though the cost was very high.

Mopping up the infantry

We are now ready to advance further into Germany and then on to the English Channel! If only the Red Air Force would join the party!

Battle Honors

In the end it was a 4-3 victory for the Soviets, but it could have easily gone the other way!

There was a lot of credit to go around this time - the Carnation battery did well as did the T-72 companies. However, possibly the most spectacular result was the lone Shilka neutralizing the enemy air power. So in honor of that effort, here is a video of a Shilka firing!


Tuesday, August 22, 2017

Battlefront's T-72 and Advanced Modeling Syndrome - Part 1

By all accounts, the Battlefront 15mm T-72 (TSBX01) for use with Team Yankee is a great little miniature / kit. I did a quick review of the miniatures when they first came out with the original Team Yankee boxed sets in 2015, but now that I'm finally getting my East Germans together and ready for painting, I'm taking a more critical look at the miniature to make sure it's ready for painting.

Depending on the sophistication of the injection molding process - and the degree of shrinkage as the injection molded plastic cools - the final parts may have imperfections known as sinkholes in them. These generally occur in thicker areas of the part - and as luck would have it generally obscure some critical detail. On the T-72 visible sinkholes (post construction) appear to be generally confined to the turret stowage boxes.

Sinkholes in the stowage boxes on the T-72 turret

There are two sinkholes sometimes found on the rear of the stowage boxes marring the box detail. There is also usually one on the side as well. At this point the modeler has three options:

  • Option 1:  Do nothing - paint it up and go. 
  • Option 2:  Fill the holes, sand them down, and go. Don't try to recreate the pattern on the boxes
  • Option 3:  Fill the holes and recreate the original pattern to make the final product look like a part without sinkholes.

Okay - so since this is me we're talking about - which one did I choose? Is that even a question?

Filled rear sinkholes on T-72 turret - the green areas were formerly recessed

Step one in restoring the stowage boxes is to fill the holes and sand down the putty. I use Squadron Green Putty for most of my fill work. You should wait until it is completely hardened to sand it. I generally let it sit for 24 hours.

Filled side sinkhole on T-72 turret - mold line clean-up still needed 

One the putty has dried, I us a combination of sanding sticks and fine files to flatten and smooth out the area. This results in a good flat surface, but it is now devoid of the surface details which were originally supposed to be there (and were obliterated by the sinkholes). 


Ultra-thin styrene sheet and a dental tool are used to emboss new surface detail

So now comes the hard part - how do you re-create the surface detail? Fortunately the detail on the T-72 turret boxes are relatively simple horizontal lines. Any time I'm making new surface detail, I use ultra-thin styrene sheet (in the U.S. Evergreen is a good source of sheets - I use the 0.005" / 0.13mm for my fine detail work) and emboss it with a dental tool.

Embossed lines - lines were pre-measured and drawn

Some surface details are easy enough to do freehand, but in cases like this it is important to at least draw out a rough outline of what needs to be embossed first. In this case I found the entire detail panel to be about 0.15" tall by a little more than 0.4" wide. I split the difference evenly for the horizontal lines.

Embossed lines - be careful with your pencil! It will emboss as well!

Once you've generated your surface detail, then comes the tricky part - no really! Extremely thin styrene should be attached with a liquid cement, but you must use the liquid cement sparingly or it will simply begin to dissolve the styrene and obliterate you brand new surface detail. I put on some liquid cement, let it get tacky, then let it dry overnight before trimming the detail to integrate it into the overall part

Rough detail added - final trimming and sanding remains to be completed

In the next update I'll post photos of the completed surface detail once it is trimmed back and integrated into the turret. I'll also point out a few other areas of the T-72 that could use just a little attention as well.