Miniature Ordnance Review looks at the world of historical and fantasy miniatures wargaming and model building. From 15mm Flames of War, to Warhammer 40K, to 1/35th scale tanks, with some potential surprises on the horizon - you'll find them here!

Sunday, August 31, 2014

Reinforcements Arrive for 510. Schwere Panzer-Abteilung

I finally got back to painting on the tanks for 510. Schwere Panzer-Abteilung yesterday, and I've also started working on the support units.  If you remember the list I'm working with, I need three 15cm Nebelwerfers and four Flakvierlings to round out the support choices.  I've started the process of prepping the figures for painting, and I figured I'd try and paint the guns with the rest of the armor.

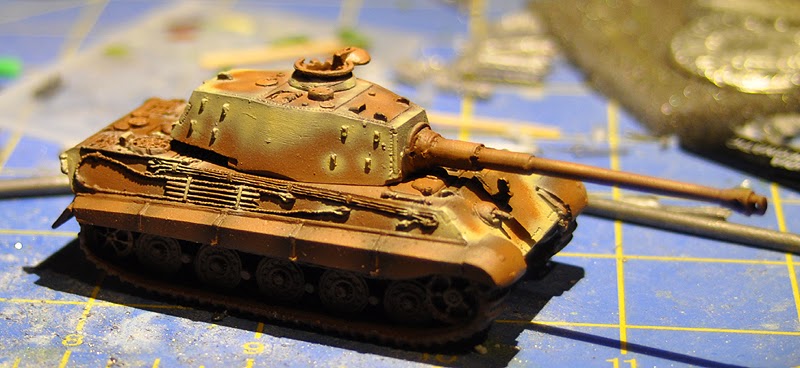
First the king tiger progress.  In previous blogs, I've detailed the one tank in primer red as well as those in the octopus scheme.  I'm now working on the ones that will be in Hinterhalt-Tarnung or Ambush camouflage. For these vehicles I've started with a base dunkelgelb which I've then modulated using AK interactive modulating paints:


Ambush camouflage comes in several varieties, but the version I'm trying to replicate is hard edged.  I therefore pulled out the Panzer putty again and began the process of masking the areas I wanted to remain yellow.  Next I painted the olivgrun, again using AK interactive modulating paints to preserve the overall modulation of the piece.  Once that is dry, you guessed it, more Panzer Putty and then it is on to the rotbraun.


The King Tigers are supported by a unit of Ersatz SS training panzers.  These are a mix of Panzer III and Panzer IV tanks which had been removed from front-line service, but are now forced back into the fray. I wanted these to look somewhat beat-up, but given there are many references showing training workshops where these tanks were maintained and repainted, I don't want to overdo it.  As with the King Tigers I started with the panzer dark yellow modulation paints, shown below.


The Schurtzen are getting the same treatment as the vehicles themselves.  Unlike the King Tigers, I wanted to go with a blotchy freehand over-spray of red-brown and olive green.  So I used the Ammo of Mig 1943-1945 wargaming set and the overspray paints there.  I found the dark yellow modulation paints in this particular set to be a little brighter than I was used to, so I'm going to have to try that again with lighter modulation coats.  So far I'm happy with how the schemes are coming out, and once weathered I think they're going to look spot on for battle-weary training panzers.


As I mentioned before, I'm also trying similar techniques with the Nebelwerfers and flak guns.  They'll need some additional hand painting as the surfaces are very irregular, but for the initial shading I think the modulation techniques will work fine.  First up are the Nebelwerfers.  Right now they're just in the base coat, which as you can see is quite dark.


I've made it further with the flak guns, I was able to go ahead and start the modulation process with them. There are whole areas I skipped simply because I know they will be covered by other parts once the full miniature is assembled.


After the modulation of the panzer dark yellow - I went ahead and overs-prayed the gun shield with the red brown and olive green while I was painting the Ersatz unit above.  The end effect looks good so far. The gun shields for the flak guns will, as well as the cradles will get some chipping and other effects.


At this point I've gone forward and gloss coated the first three King Tigers as well as the Ersatz squad and the flak guns.  I've brought them inside and have started the pin washes with a mix of AK and Ammo of MIG products.  I'm hoping to have photos that progress soon.  I've also just discovered that the tanks for my October army are not quite together yet, so I'm going to have to take a short break and finish building a couple of Tiger Tanks and one Panzer III Ausf N.  Look for those in an upcoming blog as well!

Saturday, August 23, 2014

Release the Kraken! Or More Fun with 510. King Tigers

Managed to get some more painting done today after spending the morning practicing archery and then going out plinking with some friends.  First things first, I wanted to get a decent picture of the primer red with yellow over-spray.  The natural lighting shows off the panel shading a lot better!


I was holding off on any more painting until I got my new masking material in.  I've tried both silly putty and white putty adhesive in the past.  While these both work, they have some serious shortcomings.  I'd seen listings for Panzer Putty on the web, and I finally managed to track down a couple of tins at Colorado Miniatures (THANKS!!!).  They ran me about $25 a pop (I picked up two), but the tubs are very large and it looks like they'll be more reusable than either of the other media.  Imagine my delight when I checked the mail after a great day at the range and my new Panzer Putty had arrived!


With the new putty in hand, I immediately went to work masking out the camouflage on the "octopus" scheme King Tigers.  I tried to match an existing example for one, then decided I was crazy and free-handed the other one.  The Panzer Putty is much easier to work with.  It has variable flexibility.  As you work it, it becomes more flexible, but if you let it sit it becomes much harder and adheres nicely.  You'll still want to wrap edges to keep it in place.


I'd already put down some initial base coats of the 1943-1945 panzer dark yellow base and just had a neatening coat to do on the overall yellow base vehicles left to do.  Therefore I went ahead and started base coating the yellow on the "octopus" vehicles as well.


I went ahead and panel shaded the panzer yellow with a highlight and shine coat.  The new paints are a little thicker than the old AK interactive ones, so I'm going to have to watch my pressure and paint thickness.  I've still got some work to do on the training tanks, but my priority was to go ahead and get the "octopus" tanks ready to go.  As you can see below, the maked tanks and unmasked tanks have received similar paint schemes so far.  The unmasked King tigers will have "ambush" scheme, so I'm trying to keep the layers reasonably thin at this point!


So how'd the Panzer Putty do?  In a word - AMAZING!  I was able to use thin paint layers and there seemed to be no edge buildup As you can see below - I've already got the green circles added to one of the two, while the other has just had the putty removed.


I'm using a mix of the "shadow" and "base" olive greens to do the "octopus" circles.  So far the King Tigers of 510. Schwere Panzer-Abteilung are coming out just as I'd hoped.  I still have a way to go, but I'm making progress.  I've also started scraping the infantry and the Flak guns as well, so look for them in a future entry.

Thursday, August 21, 2014

Updates from the Martian Front

The guys over at Robot Peanut have posted a couple of long-awaited updates for All Quiet on the Martian Front.  As mentioned in a previous blog, the steam tank sprues as provided give the player options that were not available in the AQMF main ruleset.  The tutorial on their webpage showed how to use the sprues to build these tanks, but the rules had been AWOL until today.  Officially released as an addendum to pages 96 through 99 of the main rulebook, there is now a PDF detailing several new varieties of steam tanks which can be built and fielded using the plastic kit.  In addition to the standard Mk II and Mk III, there are now several new variants.

Overall the Mk II tank is familiar coming in at 165 points for the unit with the option of adding a heavy machine gun (HMG) for +10 points.  Added are a Mk IIt gun tractor with a single HMG and the capability of towing an artillery piece or acting as a "Light Wrecker."  There is also the Mk IIb "Interim Tank" which has two sponson mounted 4" guns and 1 HMG at 240 points for the unit.  These are classified as "heavy tanks" and "rare."  "Rare" is a new rule indicating that only one unit can be fielded for every 2500 points. There is also a Mk IImg which has three machine guns (two in sponsons).  Together these tanks are analogous to the World War I British Male and Female tanks (like the Mark IV).  Finally there are rules for a Mk IIc command tank - taking the superstructure from a Mk III and adding it to the Mk II with a no sponsons.

There are fewer changes to the Mk III as that variant is pretty much "maxed out" in terms of modeling options. The standard Mk III still has 3x 4" guns and a machine gun with a unit of 3 costing 225.  I don't understand how the Mk III - with a higher rate of speed and an additional 4" gun - is cheaper than the Mk IIb.  Perhaps the values are switched or they failed to update the Mk III cost.  Added to the Mk III variants is the Mk IIIs with four machine guns.  Provided in single element units, the Mk IIIs are designed for infantry support and can only be taken with US Armored Infantry.

In addition to the fun new steam tank variants (which I need to finish painting!), Alien Dungeon has also released Revision 1.0 - Errata and FAQ to the AQMF ruleset.  This PDF includes error corrections as well as answers to several frequently asked questions.  Based on some of the points issues above, they may need to release an update to the update, but regardless I'm glad to see the line starting to grow and evolve.

Wednesday, August 20, 2014

World War I in Color

Because of the limitations of film technology, the epic conflicts of the early 20th Century are typically remembered in monochrome.  While black and white photography could capture action and detail, the film would only capture contrasts leaving the impression, to the modern eye at least, that the world was a drab and colorless place.  

While the debate and disagreements over the role of colorization of photographs and film still rages, color photography did actually exist during the early 20th Century.  Unfortunately long exposure times meant that action shots were impossible.  It was also an expensive process, and remained more expensive than Black and While until well into the second half of the 20th Century.  

CNN has released a recent photoblog containing extant color photographs from World War I.  The photos themselves are from a new Taschen book, The First World War in Colour.  Included in the online collection are a crashed French airship, a British tank (possibly a Mk IV), as well as self-propelled anti-aircraft guns.

For me these color pictures help make the conflict more real and relevant to a modern audience.  Black and White photography far too often seems to create a sense of distance or at least abstraction.  Color photographs present a vastly more vibrant and alive world.  As a figure painter and model-builder, these color photos also provide a good reference point, though I wouldn't try to color match using the early photos!

Monday, August 18, 2014

A (Very) Brief History of 510 Schwere Panzer-Abteilung

In Battlefront's Bridge at Remagen book, the unit history provided with the heavy tank company list details 506. Schwere Panzer-Abteilung.  However, given you can also field a forced based on 510. Schwere Panzer-Abteilung with the list (and the fact that I'm working on one such army right now), I thought it would be interesting to look into that unit's history.

One of the last Heer heavy tank battalions formed, Schwere Panzer-Abteilung 510 wasn't established until June 6, 1944.  It received its training at the Ohrdruf Training area in mid-June, and by mid July 1944 the unit was transported for action on the Eastern Front.  Initially equipped with the Tiger I tank, it spent most of the next few months fighting against the Soviets in the Baltics.

Ultimately the unit ends up fighting in Kurland, starting with the First Battle of Kurland.  By mid-March 1945, the unit had been largely spent and was pulled from the line to be reconstituted with King Tiger tanks.  The portion of the unit I'm concerned with is the third company under Oberleutnant Helpup... yes Helpup.  They received six Tiger II tanks and were dispatched to Kassel in late March / early April 1945

Based on the history I have available, 510. Schwere Panzer-Abteilung didn't officially meet up with "Westfalen" until April 18, 1945.  The company had already officially disbanded, but the fleeing soldiers were caught and ordered to man an abandoned Tiger II of 507. Schwere Panzer-Abteilung.  That being said, in the insane back-and-forth battles of April, it is clear that the 510th would have fought alongside several rag-tag units like "Westfalen."

By the end of the war, the battalion had knocked out over 200 enemy tanks.

510 Schwere Panzer-Abteilung King Tigers - First Photos

The various paint sets from Ammo of MIG have finally come in, so I'm starting to paint up the 510 Schwere Panzer-Abteilung vehicles.  As I mentioned before, 510's vehicles were devoid of markings, so I'm having to be creative in my distinction of the platoons.  Fortunately of the six or so vehicles the King Tiger company fielded in the Ruhr pocket, at least three distinct camouflage patterns were evident:  ambush, green octopus, and yellow spray over primer.

I've started with the green octopus scheme and primer tanks first.  As I now I have full modulation sets for these colors, it was time to go crazy, as it were.  I've done panel shading on 1/35th scale kits to great effect, but I've had mixed success at 15mm scale.  With the new paints I hoped to break through in small scale. Two good Iwata airbrushes, including a Custom Micron for the small detail work, shouldn't hurt my cause either. 

I started with base coats.  I ended up using the "dark base" versions of both the primer red and olive green as I thought the shadow may be too dark.  Also, my olive green set was combined with a chocolate brown, so I only had three modulation colors.


The base coats went on without any problem, and soon it was time to begin my exercise in modulation.  In short, it went very well.  I used more layers on the primer version (because I had them available) than the green, but as you can see from the photos below, the results were spectacular!


Flush with excitement, I went ahead and tried to finish up the paint job on the red primer example.  The artist rendering I have in Trojca's King Tiger book shows an over-spray of panzer yellow in several key areas. To get this right I pulled out the custom micron.  Unfortunately I lost the natural light which shows off the panel shading so well, so some of the details are lost.


You can still make out some of the shading, but the light is washing out some of the more subtle effects.  One fun aspect of the primer red King Tiger is it had two track-guards on the left side from an ambush pattern King Tiger.


I'm hoping to get some better pictures that really show off the modulation sometime this week.  I've also gotten about half of the base coats down on the ambush King Tigers, as well as the Ersatz SS Panzer Platoon. So far I'm pleased with how my exercise in modulation at 1/100th scale is turning out, and I'm even more impressed how quickly I was able to get the painting done.

Friday, August 15, 2014

Hollow Pursuits - Modeling 510 Schwere Panzer-Abteilung

As I mentioned in a previous blog entry, I'm looking at fielding a 510. Schwere Panzer-Abteilung army for the upcoming Tanksgiving tournament at Guardian Games.  This list gives me the opportunity to field a LOT of King Tigers, and still have other hulls and reasonable support as well.  It is also one of those rare cases where I can build miniatures out of the box... well, sort of... okay, you've got me, I ALWAYS have to do something to either improve on or accurize the basic miniatures.

One of the most basic modeling tricks you can use to make your miniatures pop on the tabletop is drilling out and hollowing out ports and muzzle brakes on the gun barrels.  Below you can (sort of) see a hollowed out muzzle brake on the King Tiger's 8.8cm gun.  I've also drilled out the machine gun port as well.


A good pin vise and bit collection is critical for this sort of work. 

However, I didn't stop there.  The 510 list gives you the option to field an Ersatz SS-Panzer Platoon - basically a bunch of old training tanks pressed into service.  This allows me the option to field several more worn tanks.  Remember, though, that the tank training units had their own workshops where tanks were serviced and repainted, so these are unlikely to be complete rust buckets!


The turret schurtzen of the Panzer III and Panzer IV tanks give you the opportunity to hollow out the resin so that there isn't a large block of resin at between the turret bottom and the spaced armor.  This takes a bit more work, but can be easily accomplished with a Dremel tool.  BE CAREFUL NOT to inhale the resin dust!


One last tip I'll leave you with is how to make super-glue insta-set work for you.  Most super glue setting compounds come in a large spray bottle.  These are fairly useless for the fine work on 15mm miniatures.  I instead dispense the setting solution into a small vial and use a swab to dab a little near the piece to be glued. Capillary action does the rest!


I find this technique very useful for small details like fenders - and the schurtzen frame on a Panzer IV.

At this point I have 3 of the 5 King Tigers for the list ready to go - look for them in a future blog!

Wednesday, August 13, 2014

Tanks of World War I

By starting their coverage of the Great War in 1918, Battlefront provided itself with the opportunity to develop a 15mm line of World War I armor, and thus far they have not disappointed!  Originally only available in the larger army box, blisters for the individual tank models are now coming onto the market.

Germany's A7V (GGBX01) is available in a box of two vehicles, and consists of the traditional Battlefront resin and white metal.  Also included is a decal sheet with German insignia and tank names.  With so few A7V being produced during the war, you can easily "collect them all!"

The British Mark IV tank (GBBX01) (be careful with those product codes!) is also available in a boxed set of two vehicles.  The assembly guide is not yet up yet, but early reports show that the sponsons are magnetized enabling a swap between the male and female versions of the tank.  It is unclear whether the box comes with enough sponson parts to allow full flexibility for the two tanks included. The British Whippet tank (GBR080) comes as a single tank traditional Blister pack.  Again, the detailing on the miniature looks very strong.

If you want to learn more about the tanks of World War I, Battlefront has made my article "Iron Fortresses: British & German Tanks of World War One" available on their website.  The article covers the development of the three tanks above as well as their technical specifications and some operational history.  The article is lavishly illustrated with great examples of tanks and scenery from the studio collection!

Now I just need to pick up some of these beauties and work them into my painting schedule...

Wednesday, August 6, 2014

Upcoming Tournaments in Portland

I'm sure long-time readers have probably noticed a trend on my blog.  I write a lot about history, and modeling, and painting, and converting miniatures, and lists, but not a lot about actually playing the game. There's a reason for that - I honestly don't get to play as much as I'd like to.

That being said, there are two tournaments I will be at in the Portland area that are coming up in the next few months.  The first is a 1500-point Mid War Tournament at Guardian Games in Portland, Oregon on October 25, 2014.  The second is a 1650-point Late War Tanskgiving tournament also at Guardian Games in Portland, Oregon on November 29, 2014.  Guardian Games is a SPECTACULAR venue for a tournament with generous gaming space.

I also have an ulterior reason for hawking the tournaments on my blog - you'll actually get to SEE some of the miniatures I've been working on for... well... forever!  At the MW tournament I'm planning on bringing a 1942 Tiger Company featuring the modified Early Tiger I tanks featured in earlier blog entries.  Look for some updates on this army coming soon!

For the LW tournament I'm going to be bringing something from the Remagen book.  Since I helped write most of the German lists for this book, this is YOUR chance to bring your best against the guy who wrote the lists... and thrash him soundly!  I'm planning on bringing either a 1/512 CV Jagdtiger force (see previous entries for the modeling update) or a 510 Schwere Panzer Abteilung force with RT King Tigers.

Hope to see some of you guys there!!!