Miniature Ordnance Review looks at the world of historical and fantasy miniatures wargaming and model building. From 15mm Flames of War, to Warhammer 40K, to 1/35th scale tanks, with some potential surprises on the horizon - you'll find them here!

Monday, August 31, 2015

Battlefront's Panzerkampfwagen IV Ausf H - and a New Army

I've got a late-war tournament coming up in roughly November, and the theme is "1945" - and the tournament will be 1945 points. I avoided the temptation of going with a fortified list from Berlin, because I thought it would be a bit beardy, so after wracking my brain for a list I wanted to do (which sadly doesn't include the lovely Panzer IV/70 (A) unit I've been working on in the background - as they're Autumn 1944... sort of the whole theme of that one...) I finally settled on something. More on that later, but the new list does give me a chance to use several Panzerkampfwagen IV Ausf H, alongside a few Panthers, and even some Stug IV's - yes, you read that right IV - not your garden variety III - in a tank list. Once again I'll likely die horribly, but will hopefully look good while doing it.

With a mini-host of Panzer IV Ausf H needed for the new army, and given the fact that I had a spare lying around from my aforementioned Panzer IV/70 (A) project, I decided to go ahead and build up one of the all plastic tanks from the Panzer IV H Platoon (GBX79). The original release of this miniature was a bit of a fiasco. Not only did it retain the mistake on the idler from the Ausf J plastic parts sprue, detailed in my earlier blog, but it had the wrong number of Schürtzen plates as well. As an interim measure Battlefront provided free copies of the old Panzer IV H Schürtzen (GSO186), but they ultimately had to go back and rework the tooling for this one as the errors were so bad. Fortunately they also cleaned up the idler in the process (now if they’d just go back and fix the Ausf J as well).


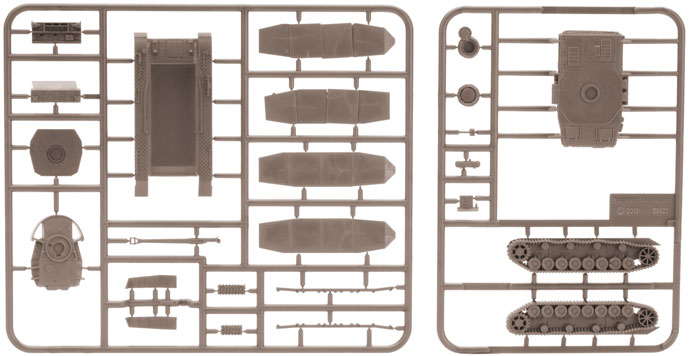
Above is a sprue from the original run - you can see the issues with the Schürtzen and idler. A painted copy is below, which shows how far the error went before it was caught when it was released into the wild.


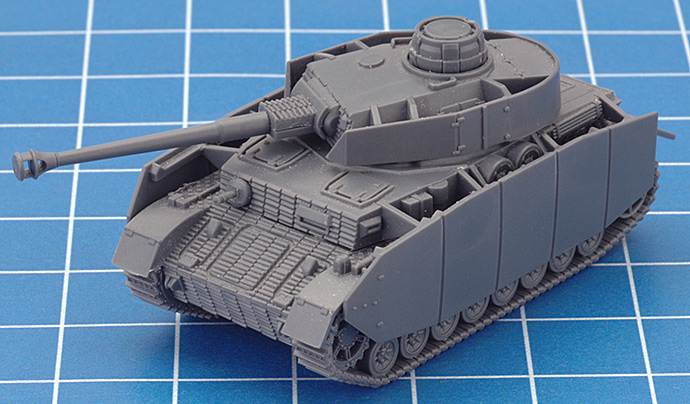
Fortunately Battlefront improved the kit... drastically. It now has the correct number of Schürtzen and the idler is correct as well. The only nit I can pick with the suspension is that all of the wheels are oriented the same way, not as big on the Panzer IV, but they do the same thing on the Stug III, and it looks a bit odd as you never see a real vehicle with it's wheels lined up perfectly.  


As pretty much every Panzer IV Ausf H had zimmerit, the plastic version has it molded in. The only drawback here is that the zimmerit looks a bit heavy and blocky to my taste. Compare the plastic version:


To the earlier resin version (GE046):


The zimmerit is much finer on the resin version. That being said, there are a lot of drawbacks to the old resin version. Installing the Schürtzen was always a royal pain in the butt. The turret Schürtzen were molded to the turret, generally with very thick hunks of resin along the bottom of the turret (I generally drilled mine out - which was also a pain in the butt). The tracks aren't nearly as nice either, though the road-wheels are molded as single cylinders rather than two wheels in parallel (if you put the Schürtzen on, you'll never see that part, though). The hull machine gun is a bit better on the old resin version, but the new one isn't bad.

All that being said, the new kit has two big advantages: 1) it's plastic and 2) the FIT. I'll start with the second one first. I continue to be impressed with the fit of the new Battlefront plastics. The Panzer IV breaks down logically into sub-assemblies, and the fit is outstanding across the board. Very little filling and puttying is needed (and that's only if you suffer from AMS - Advanced Modeler's Syndrome). The turret bottom plate can use some putty up front, and the two halves of the gun recuperator have a bit of a seam. Rare earth magnets fit easily in the top hull and the turret bottom to create a very good join between the two.

The second advantage is it is plastic. Conversions and modifications that are extremely challenging in resin and white metal see their degree of difficulty drop considerably in plastic. I'm honestly not making major changes to my Panzer IV's (other than adding some stowage and what not). The only thing I'm doing is toning down the zimmerit a bit - which is child's play - because it's PLASTIC. All it takes is a liberal dousing in liquid plastic cement (as it is a solvent - not a "glue") and it will soften those hard edges quickly.

Looking at the miniature in the previews and on the web, I was far less impressed with it than I have been in person. Softening the rough edges of the zimmerit was exceptionally easy, and the whole thing went together very quickly. Having just built up several StuG IV miniatures, I can also say I appreciated the fact that the barrel was molded with an open muzzle brake, so I don't have to drill that out myself. I'm honestly looking forward to getting more of them to finish the set, though I'm having to be careful to make sure I get the right ones - the pre-fix copies are less than useless to me.

Sunday, August 16, 2015

Krupp-Steyr Waffenträger from Heer 46

With the release of the Berlin supplement for Flames of War, there are a few of the more unusual self-propelled anti-tank vehicles available to take in your Berlin Kampfgruppe. Battlefront included the 8.8cm PaK43 auf Waffenträger as an option in the Tank-hunter Platoon on page 25. However, the Germans ended up producing several different Waffenträger on the venerable Panzer 38(t) chassis, and at this point Battlefront only produces one variant. Their version appears to be the Ardelt prototype, and is available in a full unit of three as the Waffenträger Tank-hunter Platoon (GBX88). These are neat vehicles, but I’ve always liked the look of the Krupp-Steyr version a bit better, known as the leichte Einheitswaffenträger fur 8.8cm PaK 43/3.

The Ardelt prototype simply mounted the PaK43 in a pretty much unaltered form on the back of the vehicle (shown below). This effectively created a fully mobile PaK 43 anti-tank gun, though aiming the gun through a larger arc could be problematic as the vehicle itself was somewhat narrow. This results in the vehicle having the “Awkward layout” special rule in the game.  


The Krupp version looks a bit more elegant with the large PaK 34 being housed in a small turret on the rear of the vehicle. The vehicle itself is a bit lower to the ground, and the turret in the rear is very tiny, so in game terms it would retain the "Awkward layout" rule.


While Battlefront doesn't make a miniature of this version of the Waffenträger, Heer 46 does, though he tends to sell out of his more popular miniatures frequently - it may take several visits or an email to get one in stock. Heer 46 specializes in hypothetical and prototype armor from late World War II with a focus on German subjects. Many of his products begin with 3D-printed masters, which on many subjects leads to a certain level of simplification. However, the detailing on the Krupp Waffenträger is quite good overall. It helps that the vehicle itself is slab sided with only a few details.


Overall the casting on the hull is quite good, especially for a cottage industry product, but it isn't without its problems. The mounting hole for the turret is too shallow and had to be drilled out. With the weight of the white metal main armament added, a rare earth magnet is NOT optional, and since the size of the hole is smaller than the standard Battlefront version, I'm going to need to pick up some smaller magnets.


The only glaring problem with the miniature is in the deck and rear hull casting. It is clear that the sprue attaches through the back hull, and the clean-up job (remember - likely done by hand!) isn't perfect. The deck itself has shrunk away from the mold creating a concave rather than flat profile for the upper hull. Given the rest of the detailing is so good, I'm not going to bother with correcting it. There are also some resin bubbles typically found around the rear axle, but an engraving tool makes short work of those.


The kit includes canvas covers for the turret, but I'm going to model all three of mine with the turret open. The turret sides are thick molded (the sides drop vertically from the top rather than following the angle of the plate), but throw in a couple of crewmen and you'll never notice!


What really sold me on this model was the running gear, which is absolutely beautiful! The front fenders are VERY thin and the detail on the roadwheels and sprockets is amazing for this scale. They'll paint up very nicely. 

The gun is white metal, and two out of the three I received were nearly flawless. The third had only a bit of mold slippage. Bear in mind you may have to do a fair amount of straightening as Heer 46 uses minimal packaging and mine took a little bit of a beating coming over from Europe! I'm going to add a couple of figures from the Vehicle Artillery Crew (GSO114) and a few left over from other vehicles as the miniatures themselves came with no crew. Given the stats should be exactly the same, I plan on using these little beasts as the Waffenträger in one of my Flames of War armies using the Berlin book or the digital lists. 

If you're ambitious, there are several more variants of the Waffenträger out there. In an earlier blog, I mentioned the Ammo of Mig 1945 weathering magazine covering "1945." The issue also includes an exceptionally well executed Waffenträger by Sergiucz Pęczek that is based on what appears to be fairly standard Panzer 38(t) running gear. His version is a Rheinmetall/Ardelt prototype combination which was produced in April, 1944.  

Friday, August 14, 2015

Building the Bergetiger (P)

First I want to apologize again for the lack of posts, I've been continuing to work on my Black Brigade - they're now in the basing stage. I've also been writing for a project that will be released later in the year - I can't go into details yet, but watch this space for more information in a few months. So without further ado - on to the post!

The Elefants and funnies of 653 Schwere Panzerjäger Abteilung remain a popular (and fun to model) army for Flames of War. Building some of the vehicles may seem daunting at first, but with a bit of patience most modelers can successfully perform the conversions. 

The key to any good conversion is starting with a good set of plans. Plans for the Bergetiger (P) are available in several reference books and online. The next step is to use imaging software to scale the drawings to match the miniature. In this case you’ll want to use the Tiger (P) (GE076) miniature. I typically use a set of digital or analog calipers to measure the key dimensions on the drawing which will give me a scaling factor in the imaging software. It is always best to use a longer measurement (like length) because the impact of measurement error will be minimized. When scaling, it is also best to scale all of the plans as one set of drawings rather than trying to scale them as individual drawings.

With your scaled plans in hand, you can now begin to actually convert the miniature. The Battlefront Tiger (P) miniature has the very early fenders which don’t extend beyond the vehicle sides for most of the length of the vehicle. To fix this, simply add some plastic card and sand it down to create an even fender profile along the whole length of the miniature.

Unless you want to scratch-build a lot of the details on the miniature, you’ll need to either borrow bits from other flames of war miniatures or cast portions of other miniatures to use as templates. For the Bergetiger (P) you’ll need the following details – From the Elefant (GE132) - Engine decks, top hatches, side vision port, front vision port.  From a Panzer IV Ausf G (GE044) – turret side hatches.  You’ll also need to borrow a Panzer IV hull machine gun and a Hetzer (GE101) top machine gun.


Step 1 is sadly removing most of the detail from the existing miniature as all of the Bergetiger (P) ended up with zimmerit, and the Tiger (P) miniature is clean sided.  I added zimmerit using green putty and a small flat-head screwdriver - well initially.  I actually ran into an issue during construction and had to redo the zimmerit and did it the second time with Apoxie Scuplt (which seems to work better for zimmerit) using the same small flat-head screwdriver to create the pattern. Unfortunately I didn't get photos of the Apoxie Sculpt version before painting.


I covered the whole deck in 0.05" thick styrene and then built up the rear superstructure based on the plans I'd already scaled to the correct size.  I modified a KV hatch (which was roughly the right size) to create the top hatch, but any appropriately sized circular hatch could be used.  I then went through and added the various resin details (tow hooks, engine screens, hatches, vision blocks) back to the miniature.


There are several small details (crane blocks, a small raised fence around the superstructure, etc.) that I added with styrene which can be seen on the rear half of the miniature.  I then moved on to final detailing  The hardest part of the conversion (and the hardest to keep intact on the table) is the crane itself.  I built it from a mix of brass rod, styrene rod, and wire.  Unfortunately it remains fragile.


At that point I simply added the final details like the Hetzer machine gun, and painted it alongside the other miniatures.  This particular miniature was painted before I started doing modulation, but it still holds up pretty well on the table.  I'd hoped that Battlefront would include the option for the Bergetiger (P) in the 653 Schwere Panzerjäger Abteilung list in Fortress Italy, but instead the included the Bergepanther.  That being said, I think it would be an allowable substitution which would more accurately reflect the unit on the table.